搭建自己的nexus私有仓库12–Nexus权限配置
本文档是nexus系列课程第12篇,使用Nexus API接口配置用户权限。
0. 情况说明
nexus系列课程第9-11篇详细讲解了通过Python调用Nexus API接口创建Nexus相关仓库。
已经完成以下需求:
- [√] Neuxs API接口调用时,是否有动态Token,如何正确获取API接口Token值。
- [√] 创建docker blob对象存储,将docker单独存放在该blob对象存储中。
- [√] 激活【Docker Bearer Token Realm】,让能够匿名下载Docker镜像。
- [√] 创建yum、pypi、maven、docker之类的仓库,docker仓库由于涉及到三种类型的仓库创建,并且有端口配置,使用API时优先创建yum和pypi代理代理仓库来测试API接口。
本篇需要完成以下需求:
- 快速创建一个用户账号,如账号名为
devops,并将给其授权能够朝docker-hosted仓库推送镜像。
1. 业务分析
在创建用户前,我们先分析一下现有用户是如何配置了。
1.1 本地账号分析
在Nexus管理页面,依次点击【Security】-【Users】:
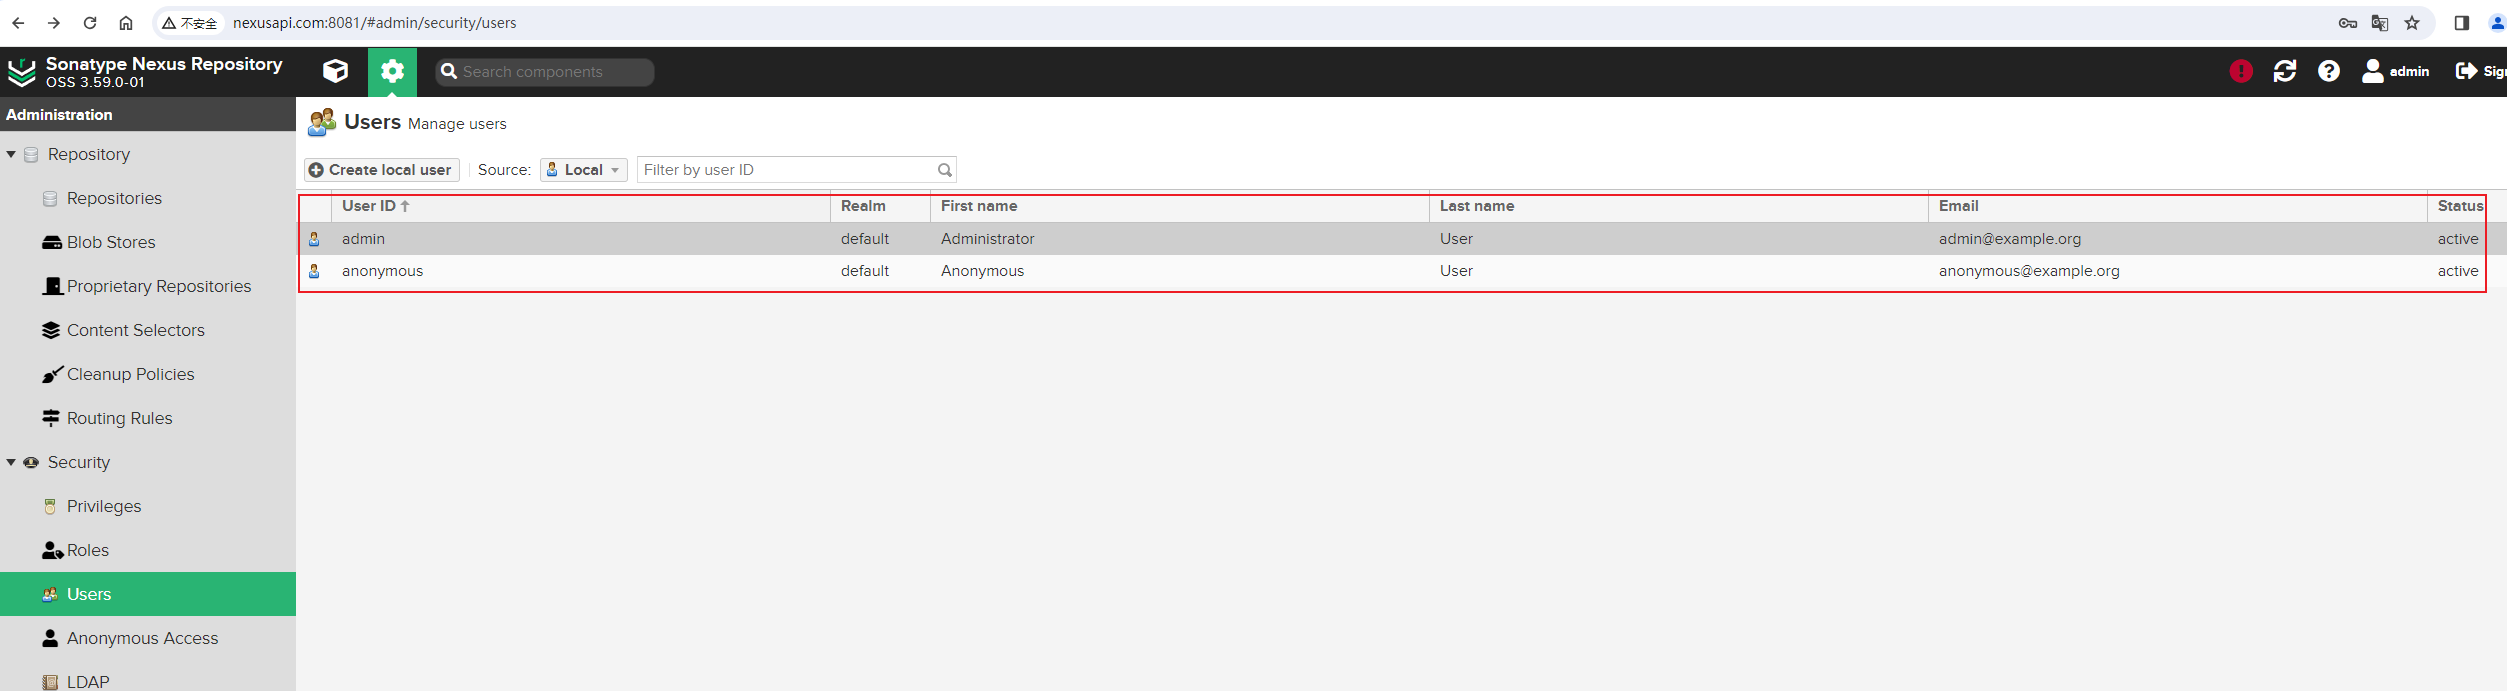
可以看到,当前有两个本地用户,一个是admin管理员用户,另外一个是anonymous匿名用户。点击一下anonymous匿名用户,查看其有什么权限:
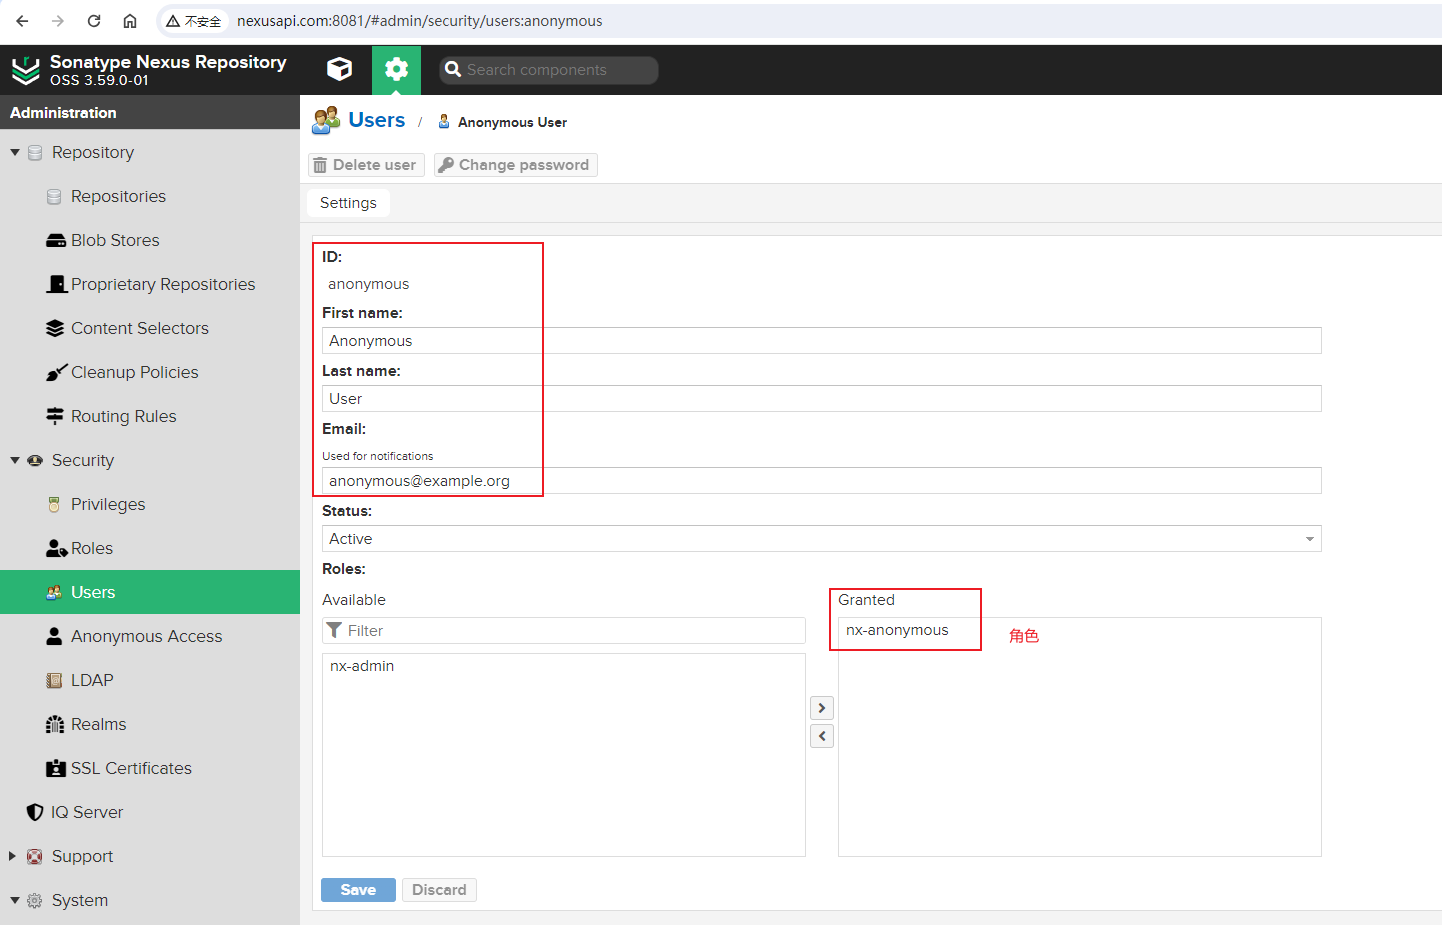
可以看到有以下信息:
- ID: anonymous
- First Name: Anonymous
- Last Name: User
- Email: anonymous@example.org
- Status: Active
- Roles: nx-anonymous
再看一下admin管理员用户的信息:

可以看到管理人配置的信息如下:
- ID: admin
- First Name: Administrator
- Last Name: User
- Email: admin@example.org
- Status: Active
- Roles: nx-admin
可以看到,用户权限是通过Roles角色来控制的,管理员用户配置了nx-admin角色,匿名用户配置了nx-anonymous角色。
1.2 角色分析
在Nexus管理页面,依次点击【Security】-【Roles】:
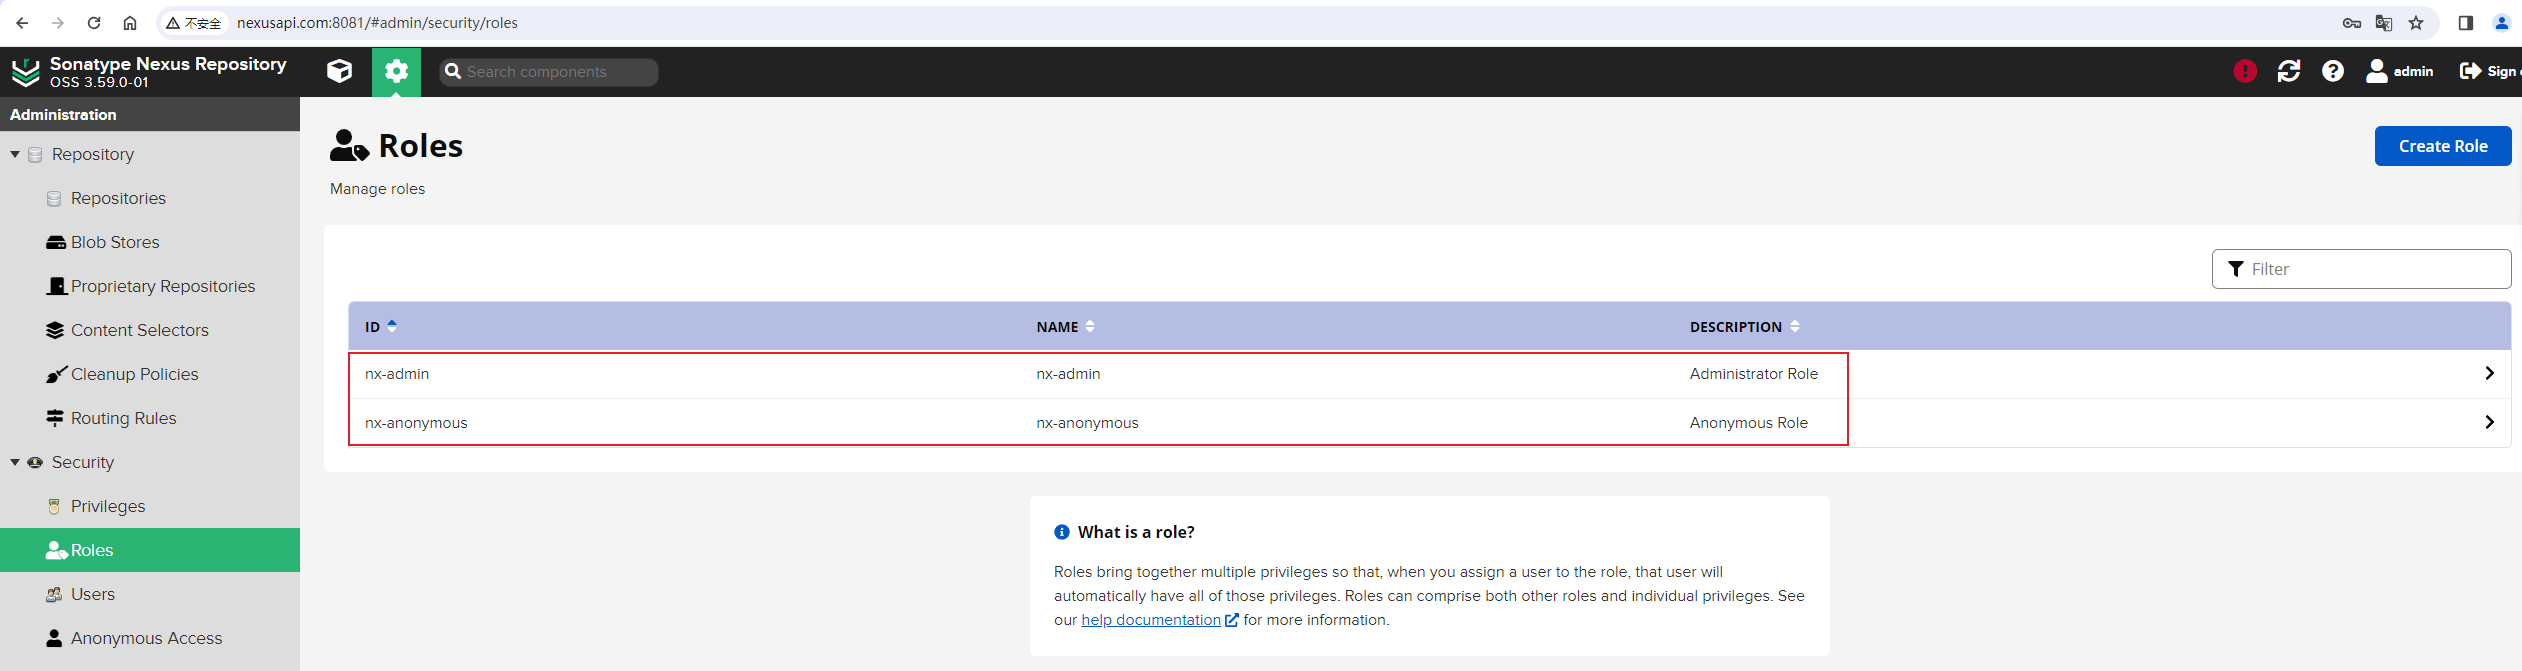
可以看到,有nx-admin和nx-anonymous两个角色。
nx-admin角色详情如下:
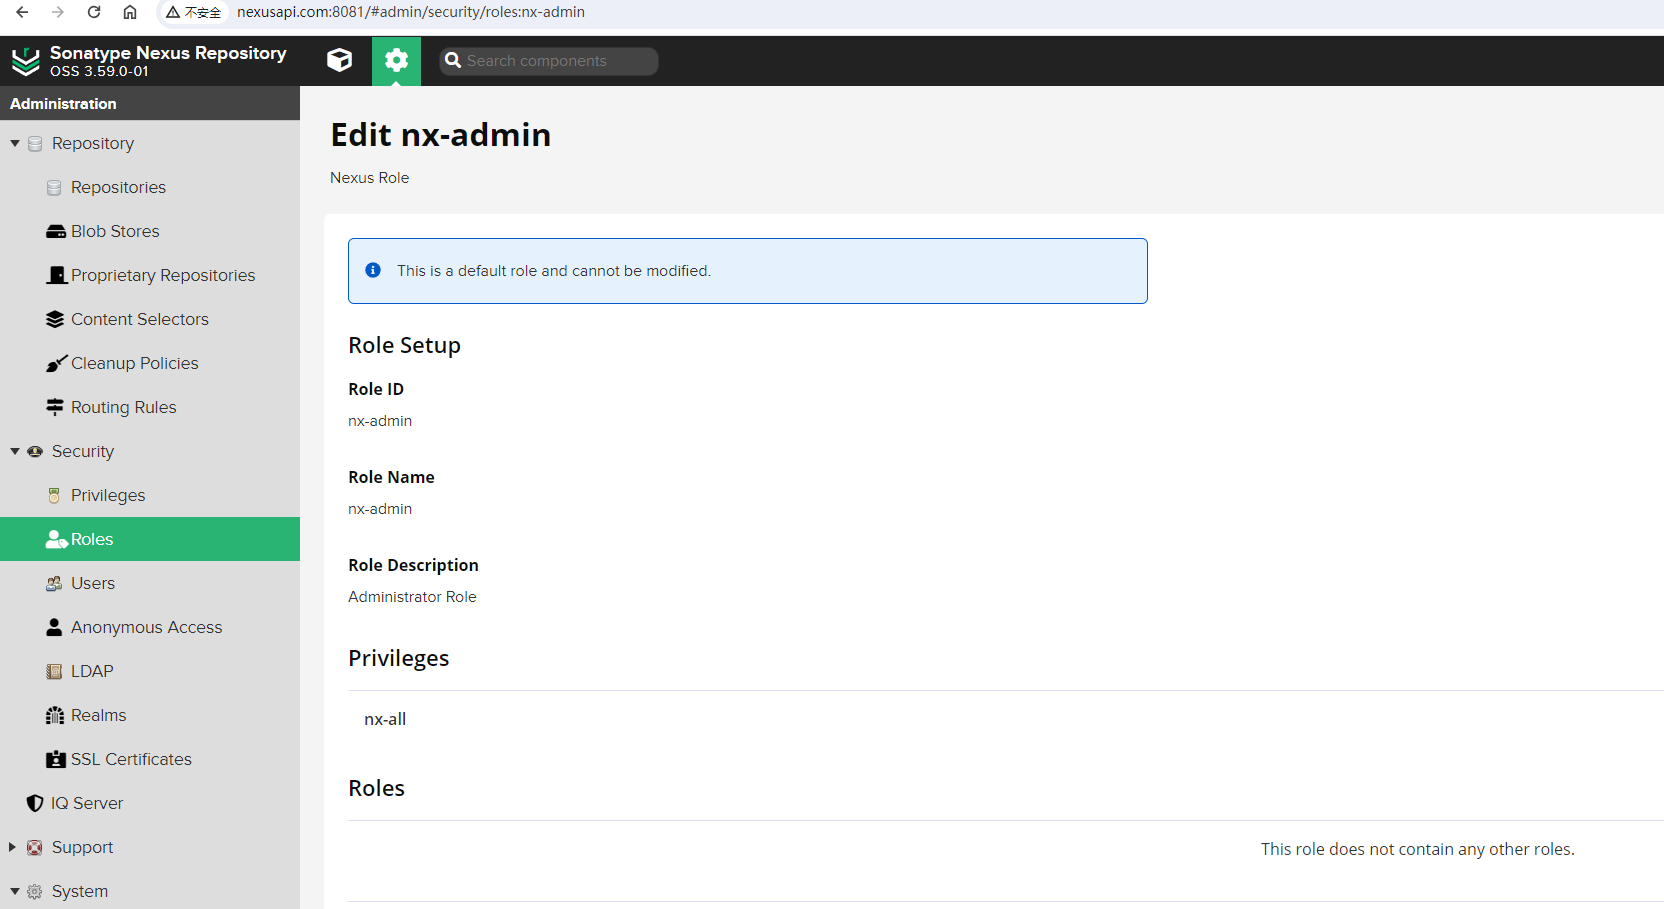
即:
而nx-anonymous角色详情如下:
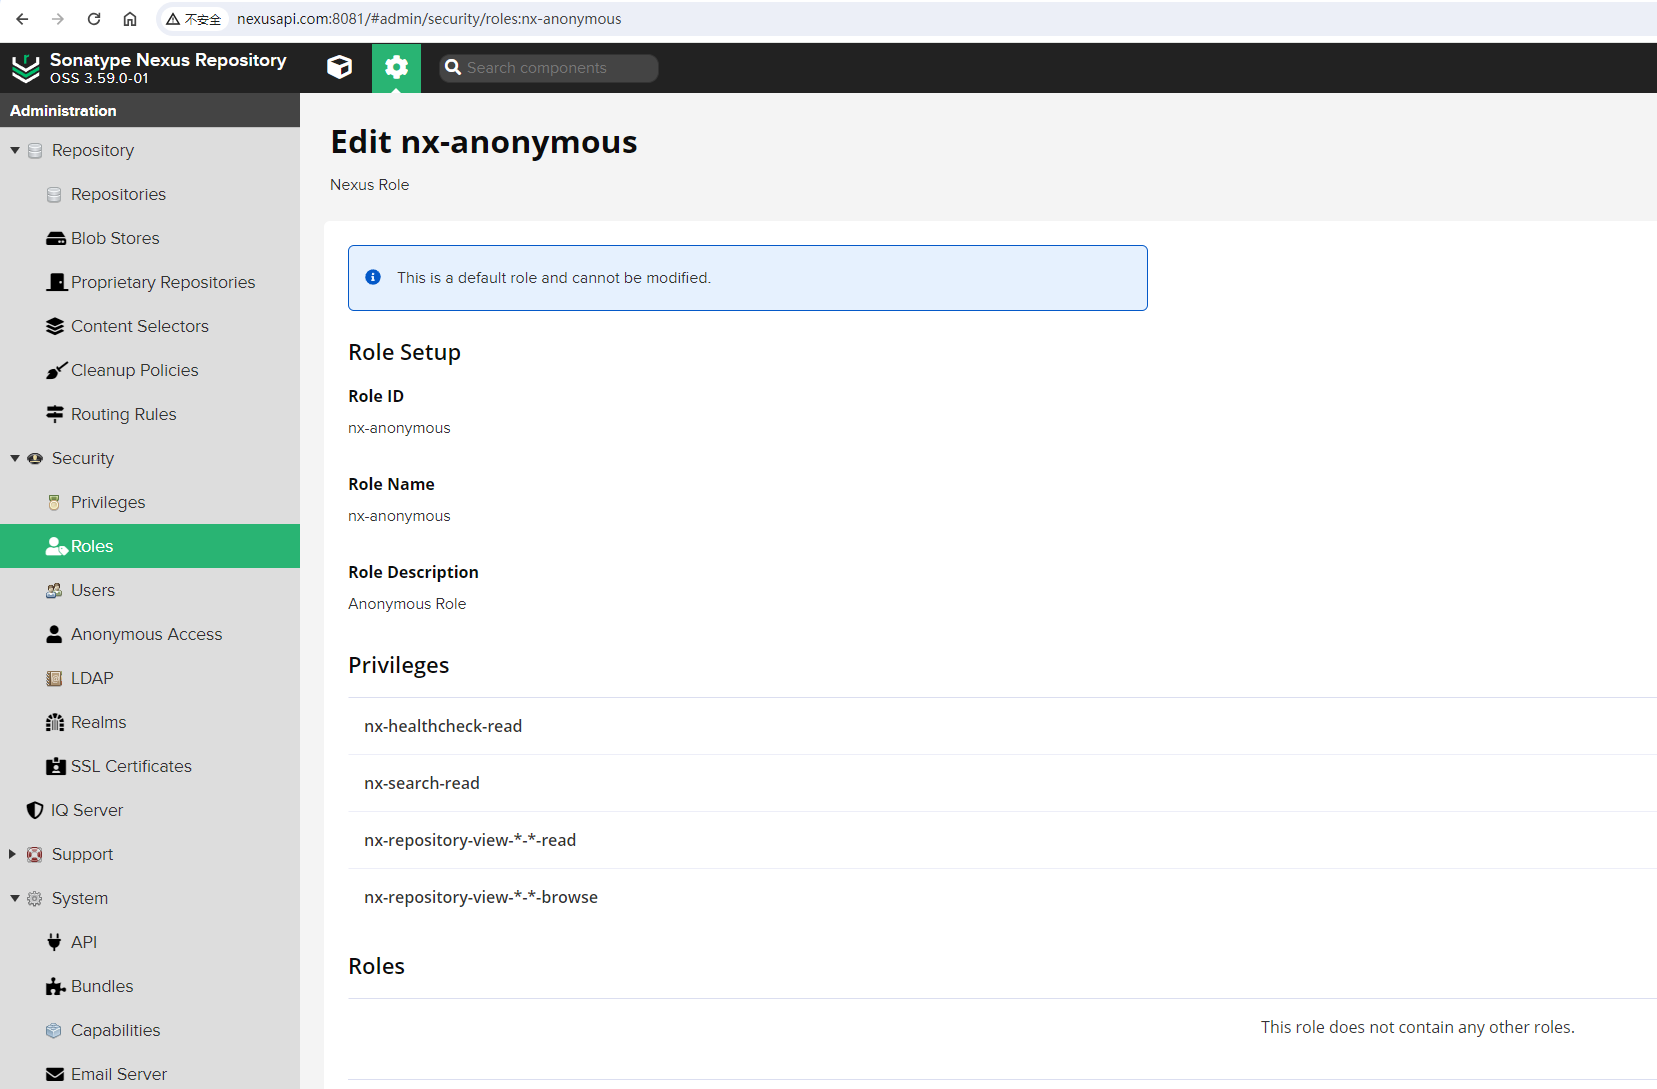
即:
- Role ID: nx-anonymous
- Role Name: nx-anonymous
- Role Description: Anonymous Role
- Privileges:
- nx-healthcheck-read
- nx-search-read
- nx-repository-view---read
- nx-repository-view---browse
通过分析匿名用户的权限可以知道,在未登陆Nexus系统时,匿名用户是可以搜索仓库和在Browse浏览器中浏览仓库信息的。我们要创建的devops用户,只需要比匿名用户新增朝docker-hosted本地仓库推送镜像的权限即可。
1.3 权限分析
在Nexus管理页面,依次点击【Security】-【Privileges】,并搜索docker关键字,查看docker查看的权限:
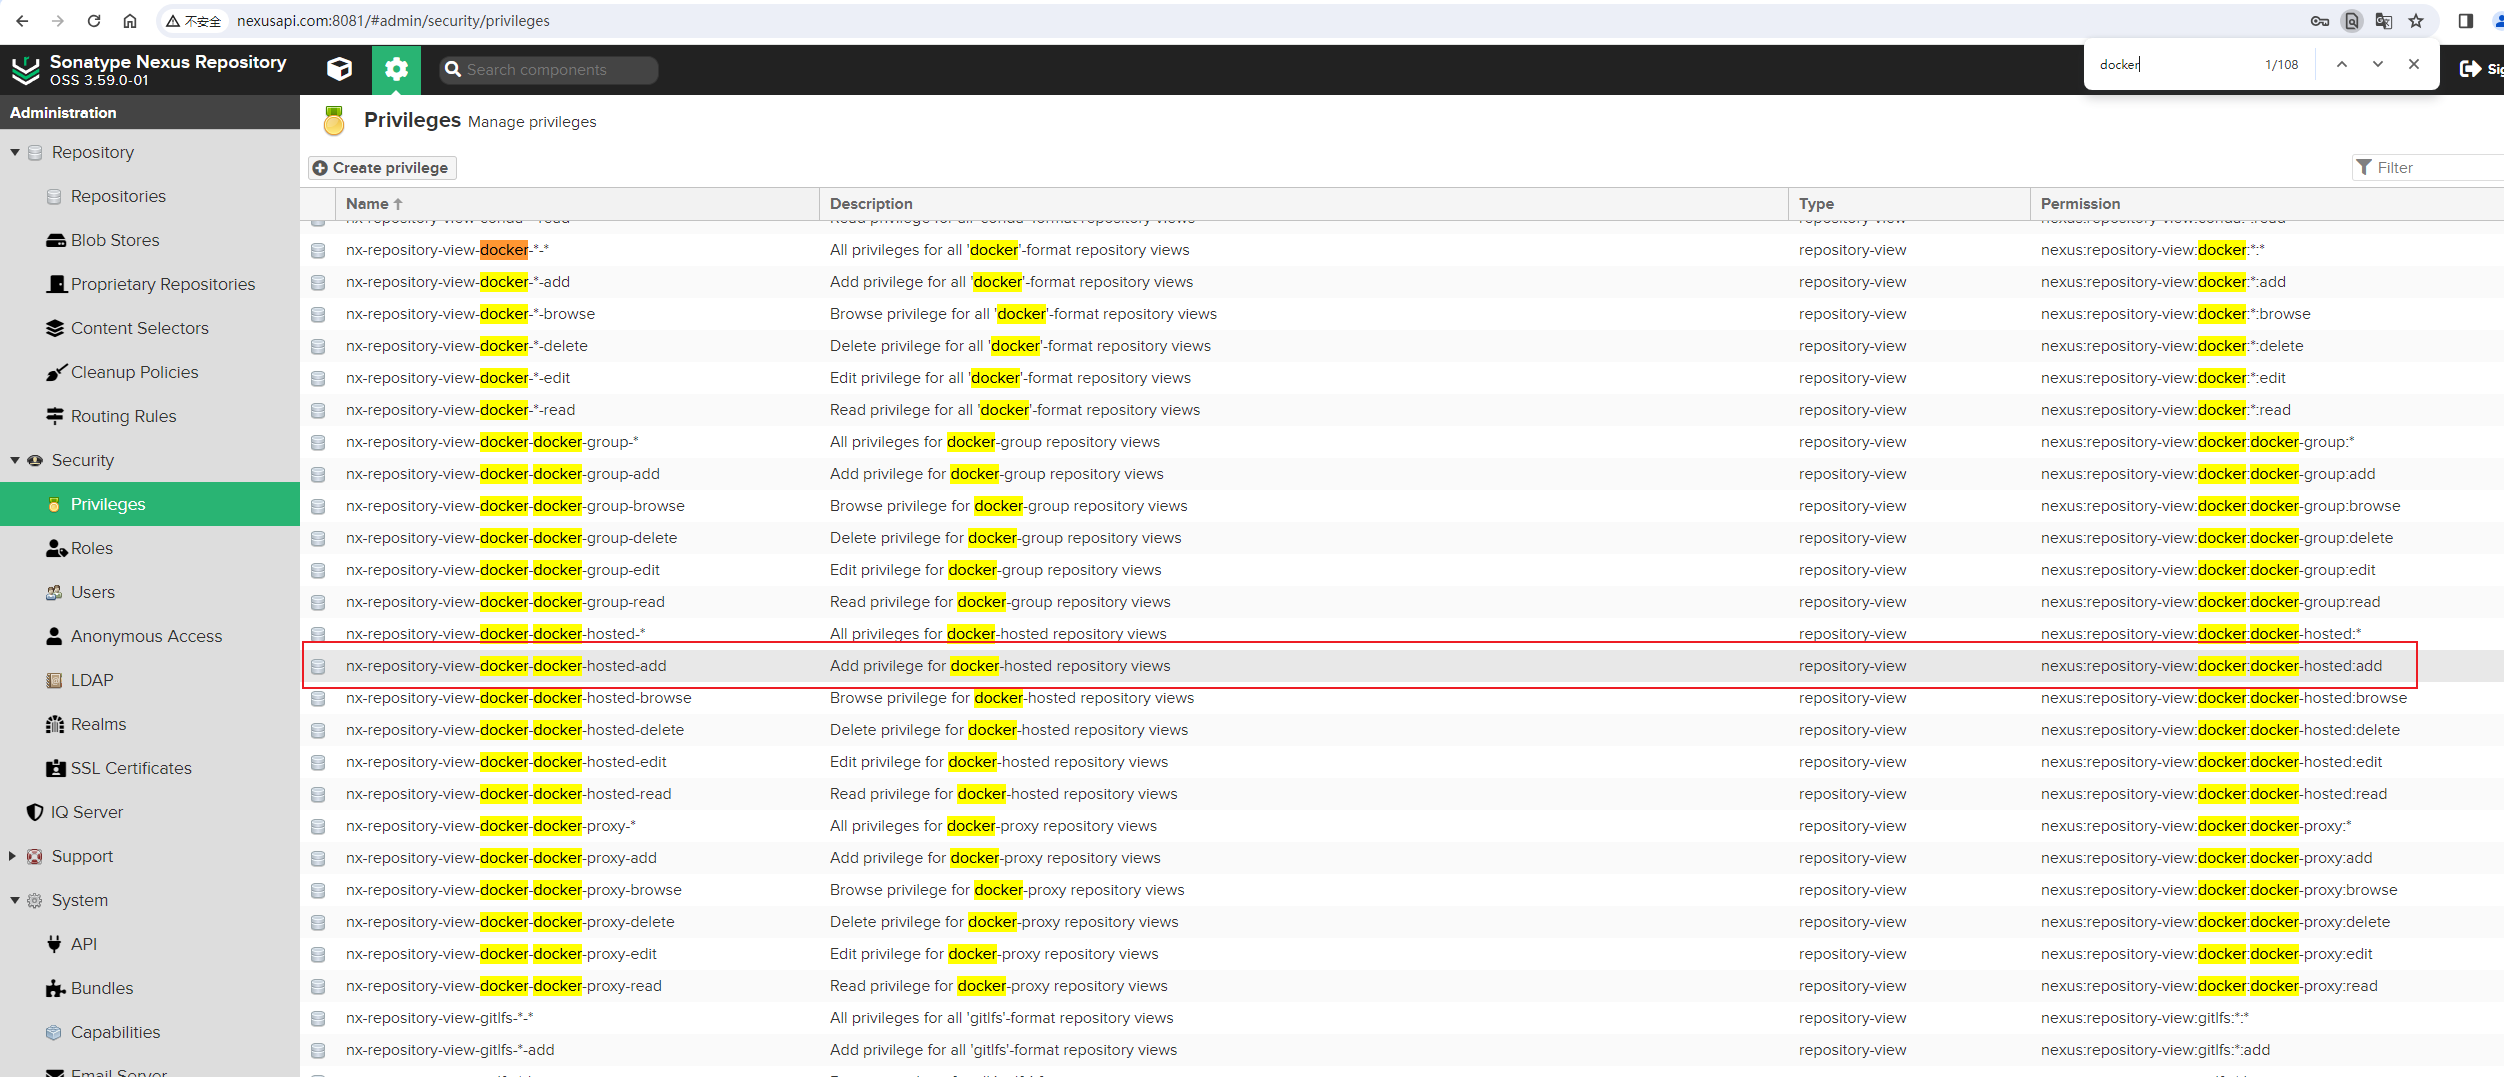
为了让devops这个普通用户能够上传docker镜像,我们需要增加nx-repository-view-docker-docker-hosted-add权限,还需要增加nx-repository-view-docker-docker-hosted-edit权限。
2. 用户权限测试
我们先来创建一个测试一下,创建一个test账号。
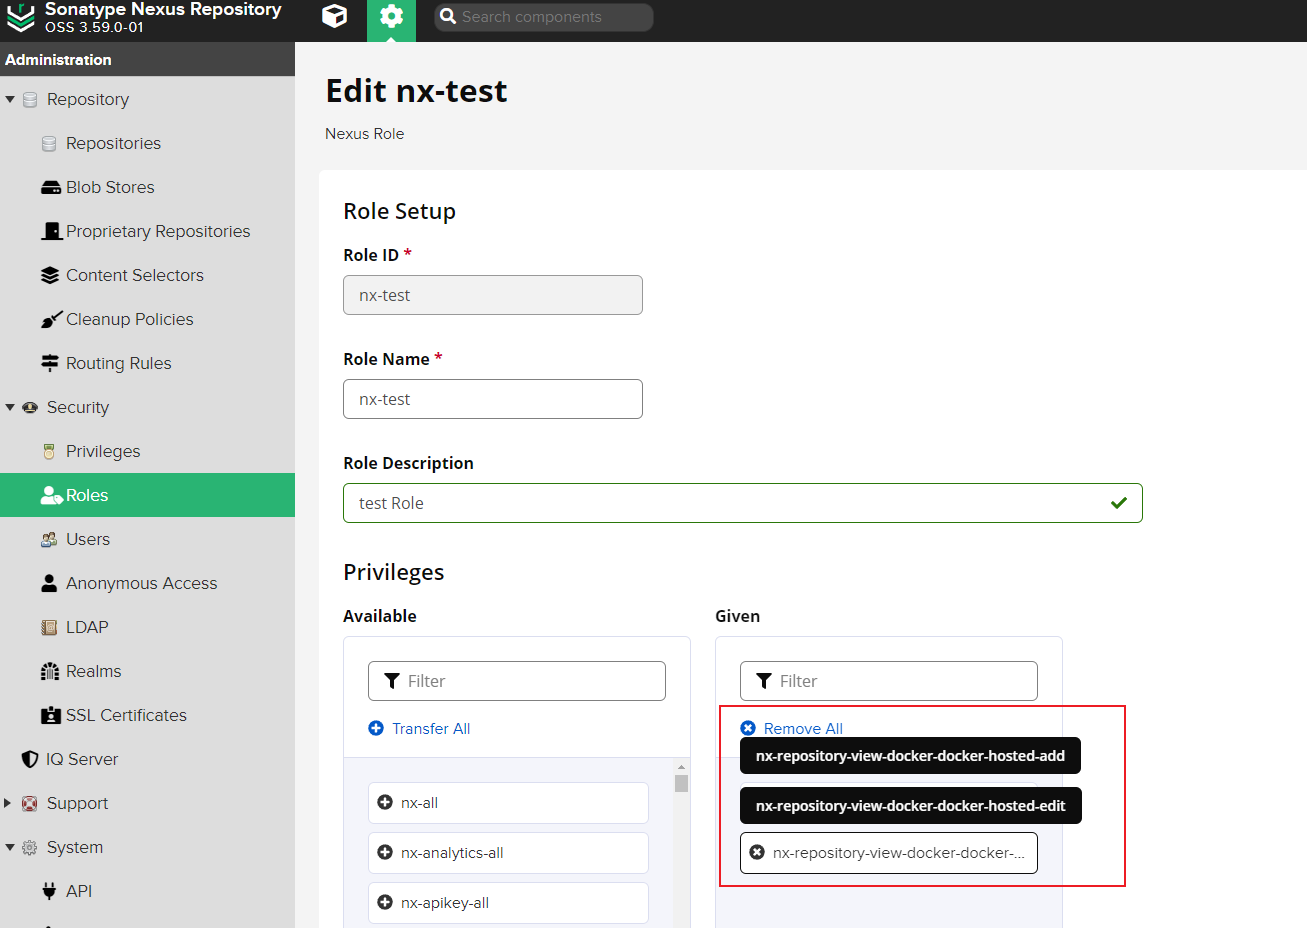
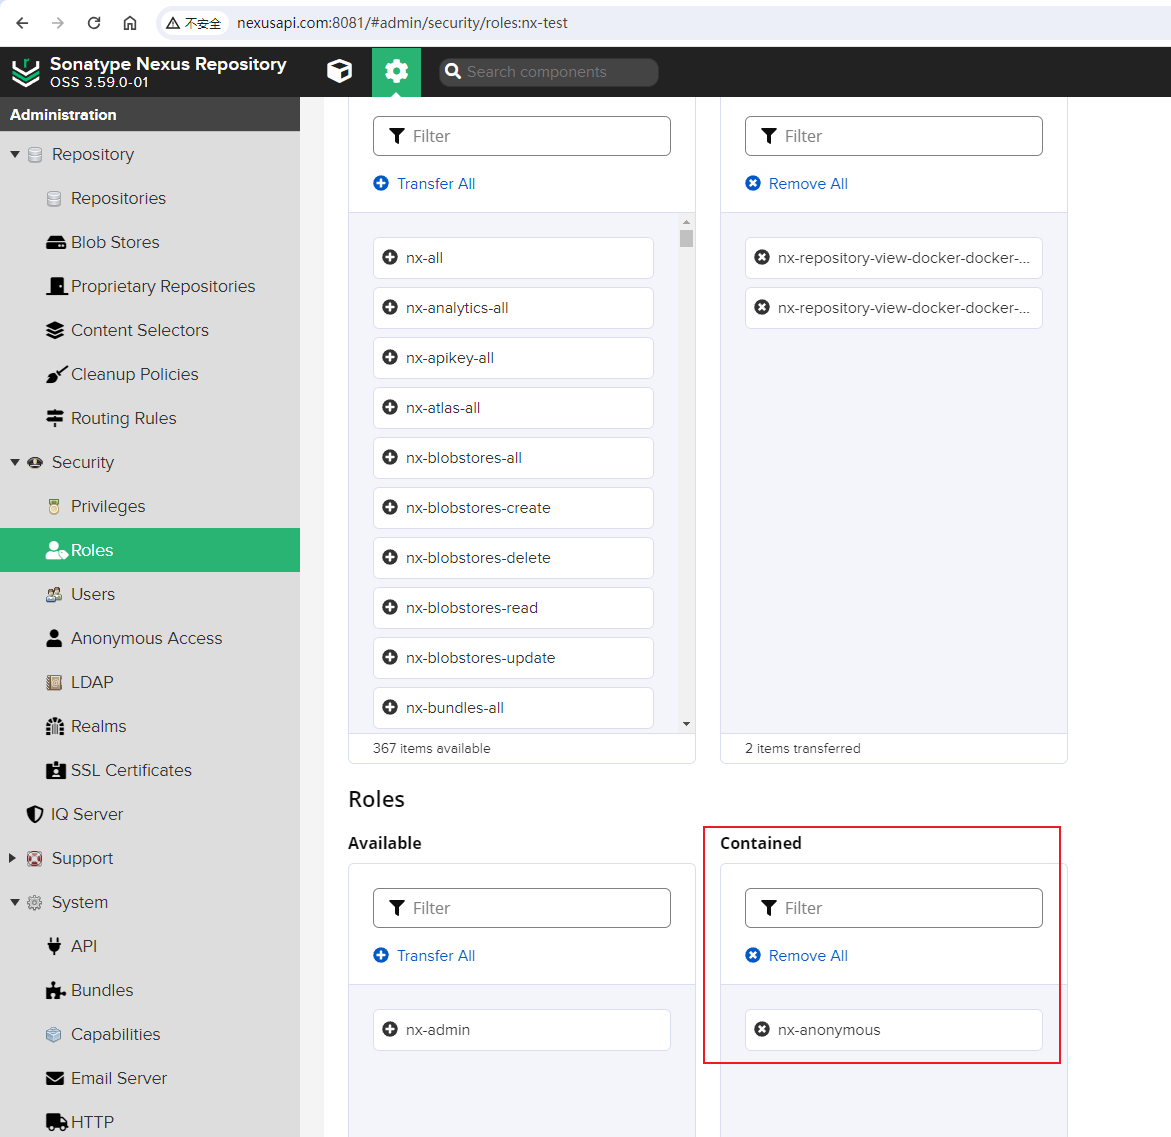
2.1 创建测试角色
创建nx-test角色:
2.2 创建测试用户
配置测试用户test相关信息:
- ID: test
- First Name: test
- Last Name: User
- Email: test@example.org
- Status: Active
- Roles: nx-test

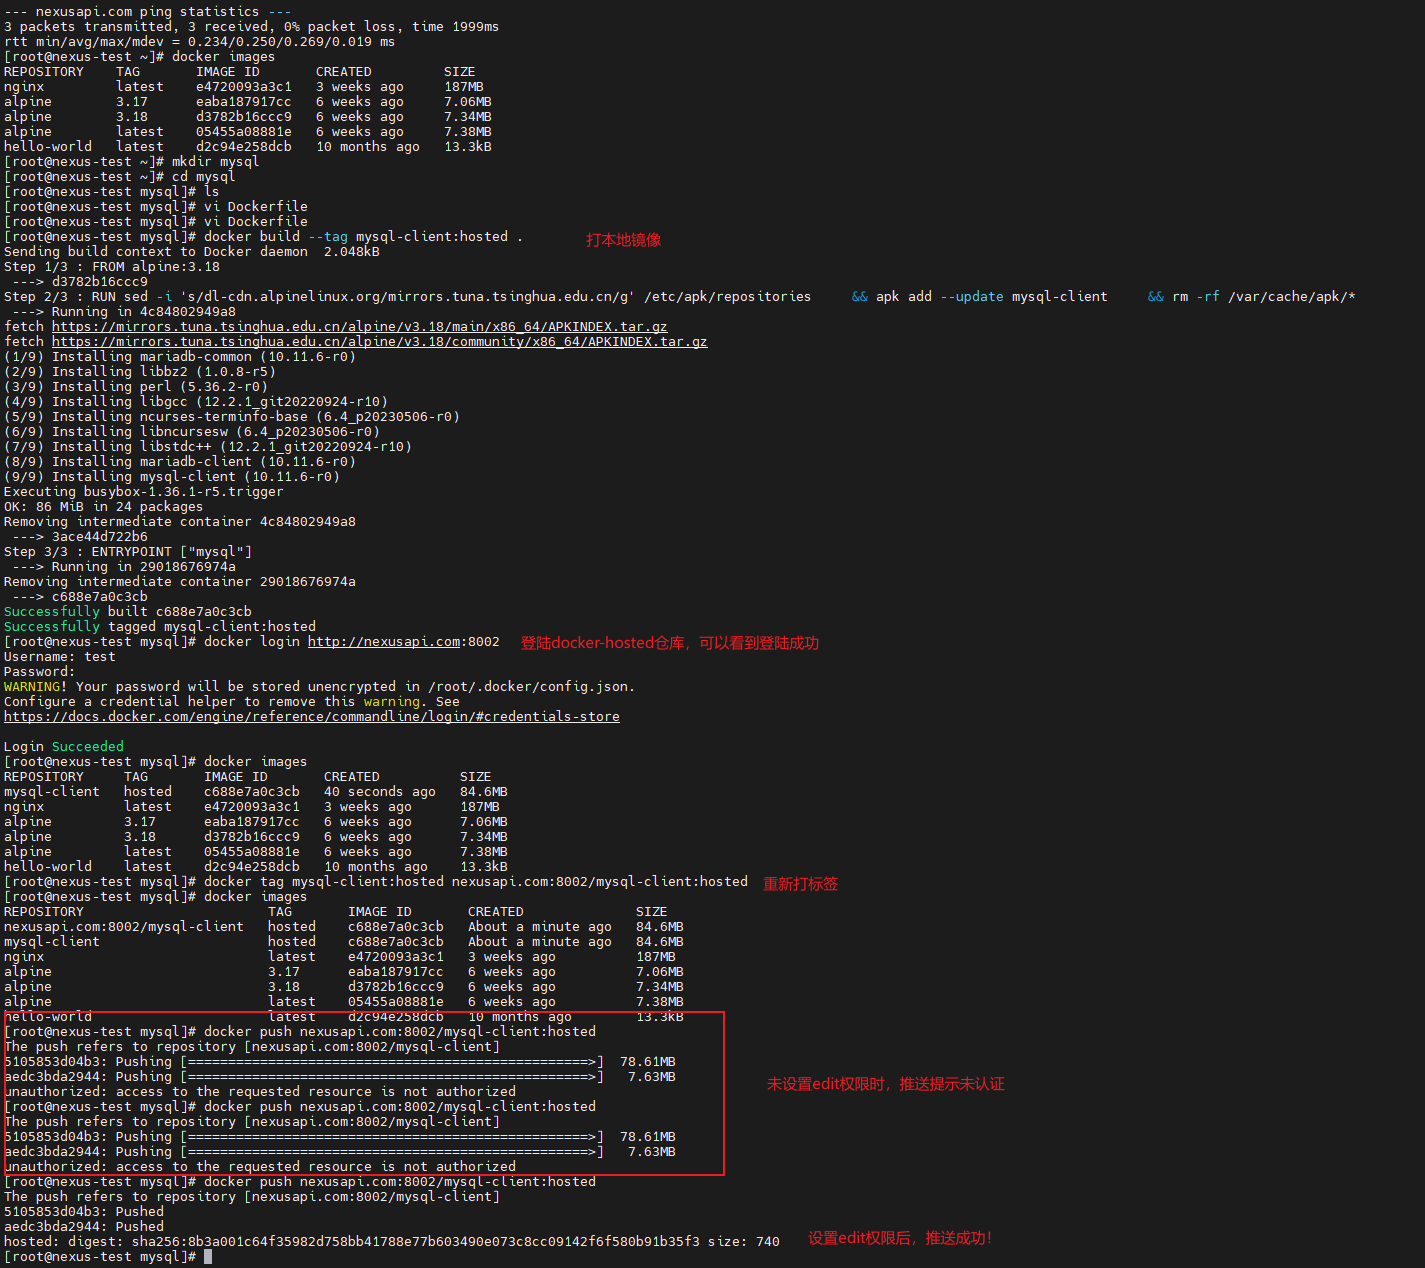
2.3 测试推送
本地打镜像测试推送到docker-hosted仓库:
  1
  2
  3
  4
  5
  6
  7
  8
  9
 10
 11
 12
 13
 14
 15
 16
 17
 18
 19
 20
 21
 22
 23
 24
 25
 26
 27
 28
 29
 30
 31
 32
 33
 34
 35
 36
 37
 38
 39
 40
 41
 42
 43
 44
 45
 46
 47
 48
 49
 50
 51
 52
 53
 54
 55
 56
 57
 58
 59
 60
 61
 62
 63
 64
 65
 66
 67
 68
 69
 70
 71
 72
 73
 74
 75
 76
 77
 78
 79
 80
 81
 82
 83
 84
 85
 86
 87
 88
 89
 90
 91
 92
 93
 94
 95
 96
 97
 98
 99
100
101
102
103
104
105
106
107
108
109
110
111
112
113
114
115
116
117
118
119
120
121
122
123
124
125
126
127
128
129
130
131
132
133
134
135
136
137
138
139
140
141
| ## 修改docker配置
[root@nexus-test ~]# cat /etc/docker/daemon.json|jq
{
"insecure-registries": [
"nexusapi.com:8001",
"nexusapi.com:8002"
],
"registry-mirrors": [
"http://nexusapi.com:8001",
"http://nexusapi.com:8002"
],
"data-root": "/data/docker"
}
## 启动docker服务
[root@nexus-test ~]# systemctl start docker
## 查看域名解析
[root@nexus-test ~]# cat /etc/hosts
127.0.0.1 localhost localhost.localdomain localhost4 localhost4.localdomain4
::1 localhost localhost.localdomain localhost6 localhost6.localdomain6
## Nexus API
192.168.56.130 nexusapi.com
106.2.45.242 hub-mirror.c.163.com
## 尝试能不能正常ping通自定义域名
[root@nexus-test ~]# ping nexusapi.com
PING nexusapi.com (192.168.56.130) 56(84) bytes of data.
64 bytes from nexusapi.com (192.168.56.130): icmp_seq=1 ttl=64 time=0.269 ms
64 bytes from nexusapi.com (192.168.56.130): icmp_seq=2 ttl=64 time=0.234 ms
64 bytes from nexusapi.com (192.168.56.130): icmp_seq=3 ttl=64 time=0.248 ms
^C
--- nexusapi.com ping statistics ---
3 packets transmitted, 3 received, 0% packet loss, time 1999ms
rtt min/avg/max/mdev = 0.234/0.250/0.269/0.019 ms
## 查看当前存在的镜像
[root@nexus-test ~]# docker images
REPOSITORY TAG IMAGE ID CREATED SIZE
nginx latest e4720093a3c1 3 weeks ago 187MB
alpine 3.17 eaba187917cc 6 weeks ago 7.06MB
alpine 3.18 d3782b16ccc9 6 weeks ago 7.34MB
alpine latest 05455a08881e 6 weeks ago 7.38MB
hello-world latest d2c94e258dcb 10 months ago 13.3kB
## 创建本地镜像配置文件
[root@nexus-test ~]# mkdir mysql
[root@nexus-test ~]# cd mysql
[root@nexus-test mysql]# ls
[root@nexus-test mysql]# vi Dockerfile
[root@nexus-test mysql]# cat Dockerfile
FROM alpine:3.18
RUN sed -i 's/dl-cdn.alpinelinux.org/mirrors.tuna.tsinghua.edu.cn/g' /etc/apk/repositories \
&& apk add --update mysql-client \
&& rm -rf /var/cache/apk/*
ENTRYPOINT ["mysql"]
[root@nexus-test mysql]#
## 构建镜像
[root@nexus-test mysql]# docker build --tag mysql-client:hosted .
Sending build context to Docker daemon 2.048kB
Step 1/3 : FROM alpine:3.18
---> d3782b16ccc9
Step 2/3 : RUN sed -i 's/dl-cdn.alpinelinux.org/mirrors.tuna.tsinghua.edu.cn/g' /etc/apk/repositories && apk add --update mysql-client && rm -rf /var/cache/apk/*
---> Running in 4c84802949a8
fetch https://mirrors.tuna.tsinghua.edu.cn/alpine/v3.18/main/x86_64/APKINDEX.tar.gz
fetch https://mirrors.tuna.tsinghua.edu.cn/alpine/v3.18/community/x86_64/APKINDEX.tar.gz
(1/9) Installing mariadb-common (10.11.6-r0)
(2/9) Installing libbz2 (1.0.8-r5)
(3/9) Installing perl (5.36.2-r0)
(4/9) Installing libgcc (12.2.1_git20220924-r10)
(5/9) Installing ncurses-terminfo-base (6.4_p20230506-r0)
(6/9) Installing libncursesw (6.4_p20230506-r0)
(7/9) Installing libstdc++ (12.2.1_git20220924-r10)
(8/9) Installing mariadb-client (10.11.6-r0)
(9/9) Installing mysql-client (10.11.6-r0)
Executing busybox-1.36.1-r5.trigger
OK: 86 MiB in 24 packages
Removing intermediate container 4c84802949a8
---> 3ace44d722b6
Step 3/3 : ENTRYPOINT ["mysql"]
---> Running in 29018676974a
Removing intermediate container 29018676974a
---> c688e7a0c3cb
Successfully built c688e7a0c3cb
Successfully tagged mysql-client:hosted
## 登陆docker-hosted本地仓库,登陆成功了
[root@nexus-test mysql]# docker login http://nexusapi.com:8002
Username: test
Password: #<------ 此处输入密码
WARNING! Your password will be stored unencrypted in /root/.docker/config.json.
Configure a credential helper to remove this warning. See
https://docs.docker.com/engine/reference/commandline/login/#credentials-store
Login Succeeded
## 查看镜像
[root@nexus-test mysql]# docker images
REPOSITORY TAG IMAGE ID CREATED SIZE
mysql-client hosted c688e7a0c3cb 40 seconds ago 84.6MB
nginx latest e4720093a3c1 3 weeks ago 187MB
alpine 3.17 eaba187917cc 6 weeks ago 7.06MB
alpine 3.18 d3782b16ccc9 6 weeks ago 7.34MB
alpine latest 05455a08881e 6 weeks ago 7.38MB
hello-world latest d2c94e258dcb 10 months ago 13.3kB
## 重新打标签
[root@nexus-test mysql]# docker tag mysql-client:hosted nexusapi.com:8002/mysql-client:hosted
[root@nexus-test mysql]# docker images
REPOSITORY TAG IMAGE ID CREATED SIZE
nexusapi.com:8002/mysql-client hosted c688e7a0c3cb About a minute ago 84.6MB
mysql-client hosted c688e7a0c3cb About a minute ago 84.6MB
nginx latest e4720093a3c1 3 weeks ago 187MB
alpine 3.17 eaba187917cc 6 weeks ago 7.06MB
alpine 3.18 d3782b16ccc9 6 weeks ago 7.34MB
alpine latest 05455a08881e 6 weeks ago 7.38MB
hello-world latest d2c94e258dcb 10 months ago 13.3kB
## nx-test角色未配置nx-repository-view-docker-docker-hosted-edit权限时,尝试推送镜像到远程仓库
## 可以看到两次都失败了
[root@nexus-test mysql]# docker push nexusapi.com:8002/mysql-client:hosted
The push refers to repository [nexusapi.com:8002/mysql-client]
5105853d04b3: Pushing [==================================================>] 78.61MB
aedc3bda2944: Pushing [==================================================>] 7.63MB
unauthorized: access to the requested resource is not authorized
## nx-test角色配置nx-repository-view-docker-docker-hosted-edit权限后,尝试推送镜像到远程仓库
## 可以正常推送到远程仓库
[root@nexus-test mysql]# docker push nexusapi.com:8002/mysql-client:hosted
The push refers to repository [nexusapi.com:8002/mysql-client]
5105853d04b3: Pushed
aedc3bda2944: Pushed
hosted: digest: sha256:8b3a001c64f35982d758bb41788e77b603490e073c8cc09142f6f580b91b35f3 size: 740
[root@nexus-test mysql]#
|
3. 通过API接口创建用户
通过前两节分析可知:
快速创建一个用户账号,如账号名为devops,并将给其授权能够朝docker-hosted仓库推送镜像这一个需求,可以分解成以下事项:
- 创建
nx-devops角色,并分配nx-repository-view-docker-docker-hosted-add和nx-repository-view-docker-docker-hosted-edit权限,并且包含nx-anonymous角色。需要使用/v1/security/roles 接口,发送POST请求。 - 创建
devops用户,并授予nx-devops角色。需要使用/v1/security/users接口,发送POST请求。

3.1 使用角色api接口
先在Nexus API页面获取所有角色的相关信息:
GET请求/v1/security/roles接口。
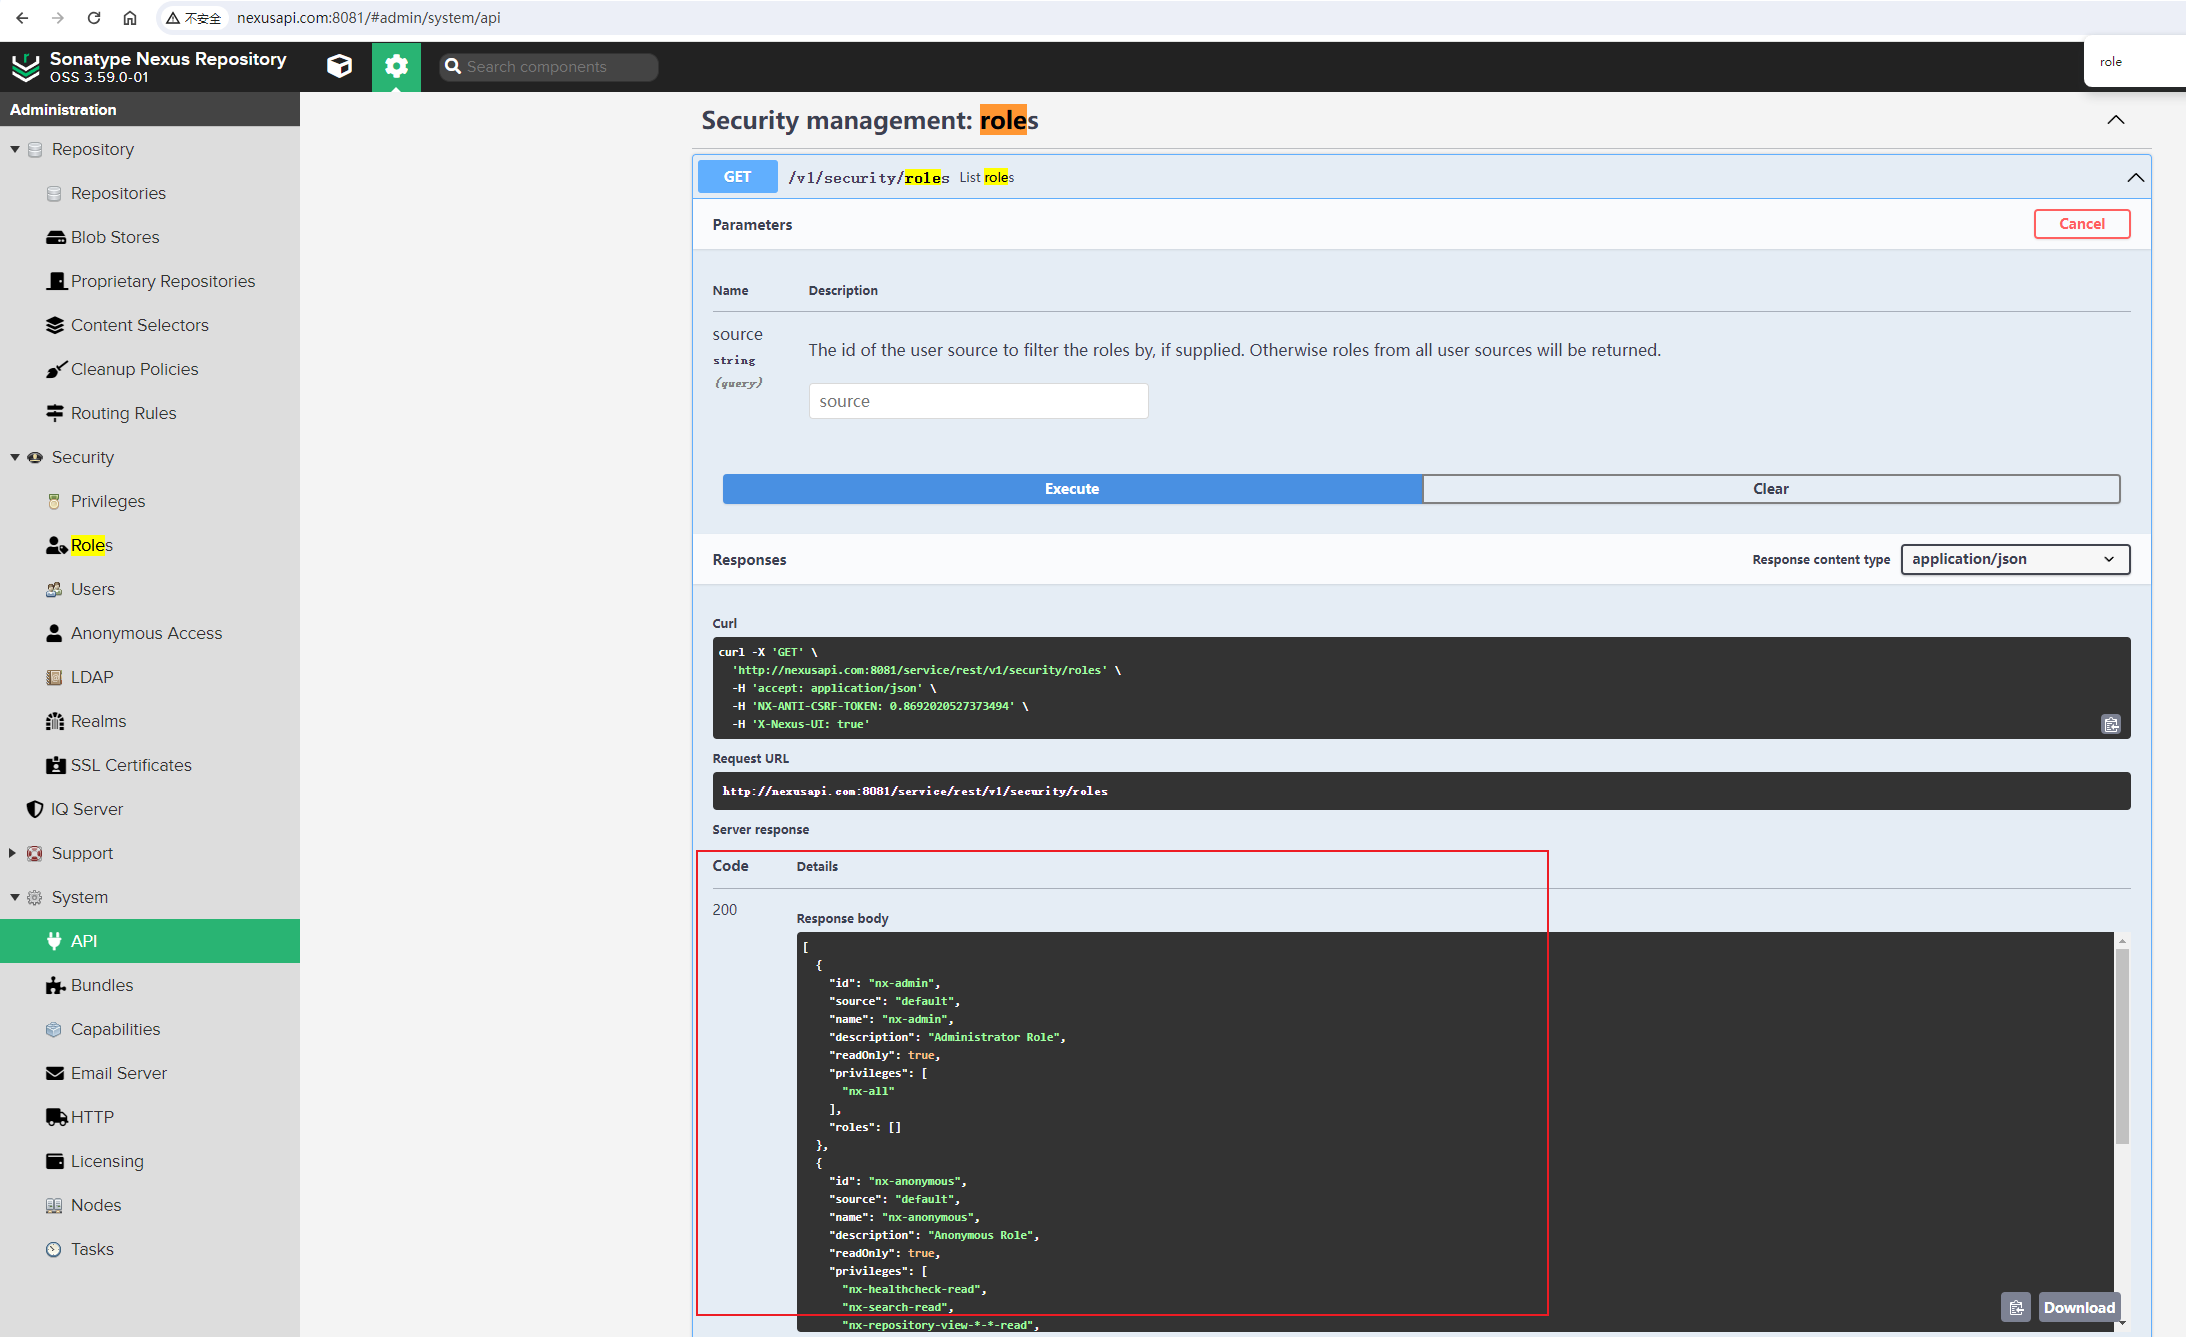
请求的返回信息如下:
 1
 2
 3
 4
 5
 6
 7
 8
 9
10
11
12
13
14
15
16
17
18
19
20
21
22
23
24
25
26
27
28
29
30
31
32
33
34
35
36
37
38
39
40
41
| [
{
"id": "nx-admin",
"source": "default",
"name": "nx-admin",
"description": "Administrator Role",
"readOnly": true,
"privileges": [
"nx-all"
],
"roles": []
},
{
"id": "nx-anonymous",
"source": "default",
"name": "nx-anonymous",
"description": "Anonymous Role",
"readOnly": true,
"privileges": [
"nx-healthcheck-read",
"nx-search-read",
"nx-repository-view-*-*-read",
"nx-repository-view-*-*-browse"
],
"roles": []
},
{
"id": "nx-test",
"source": "default",
"name": "nx-test",
"description": "test Role",
"readOnly": false,
"privileges": [
"nx-repository-view-docker-docker-hosted-add",
"nx-repository-view-docker-docker-hosted-edit"
],
"roles": [
"nx-anonymous"
]
}
]
|
我们只需要将nx-test角色相关的内容中test修改成我们需要通过api创建的用户devops即可。
在 nexus_api/config文件夹下创建role.json配置文件,其内容如下:
 1
 2
 3
 4
 5
 6
 7
 8
 9
10
11
12
| {
"id": "nx-devops",
"name": "nx-devops",
"description": "Devops Role",
"privileges": [
"nx-repository-view-docker-docker-hosted-add",
"nx-repository-view-docker-docker-hosted-edit"
],
"roles": [
"nx-anonymous"
]
}
|
Python代码优化过程,详见 nexus系列课程第11篇,请参考 搭建自己的nexus私有仓库11–Nexus API接口的使用优化, 此处不再详细解释。
创建角色主要是增加了以下代码:
1
2
3
4
5
6
7
8
| def create_role(self):
"""创建普通用户角色"""
logger.info('创建普通用户角色')
role_file = f'{CONFIG_DIR}/role.json'
payload = self.load_json_config_file(json_file=role_file)
api = f'/v1/security/roles'
self.curl(api=api, method='POST', payload=payload)
logger.success(f'成功创建用户角色')
|
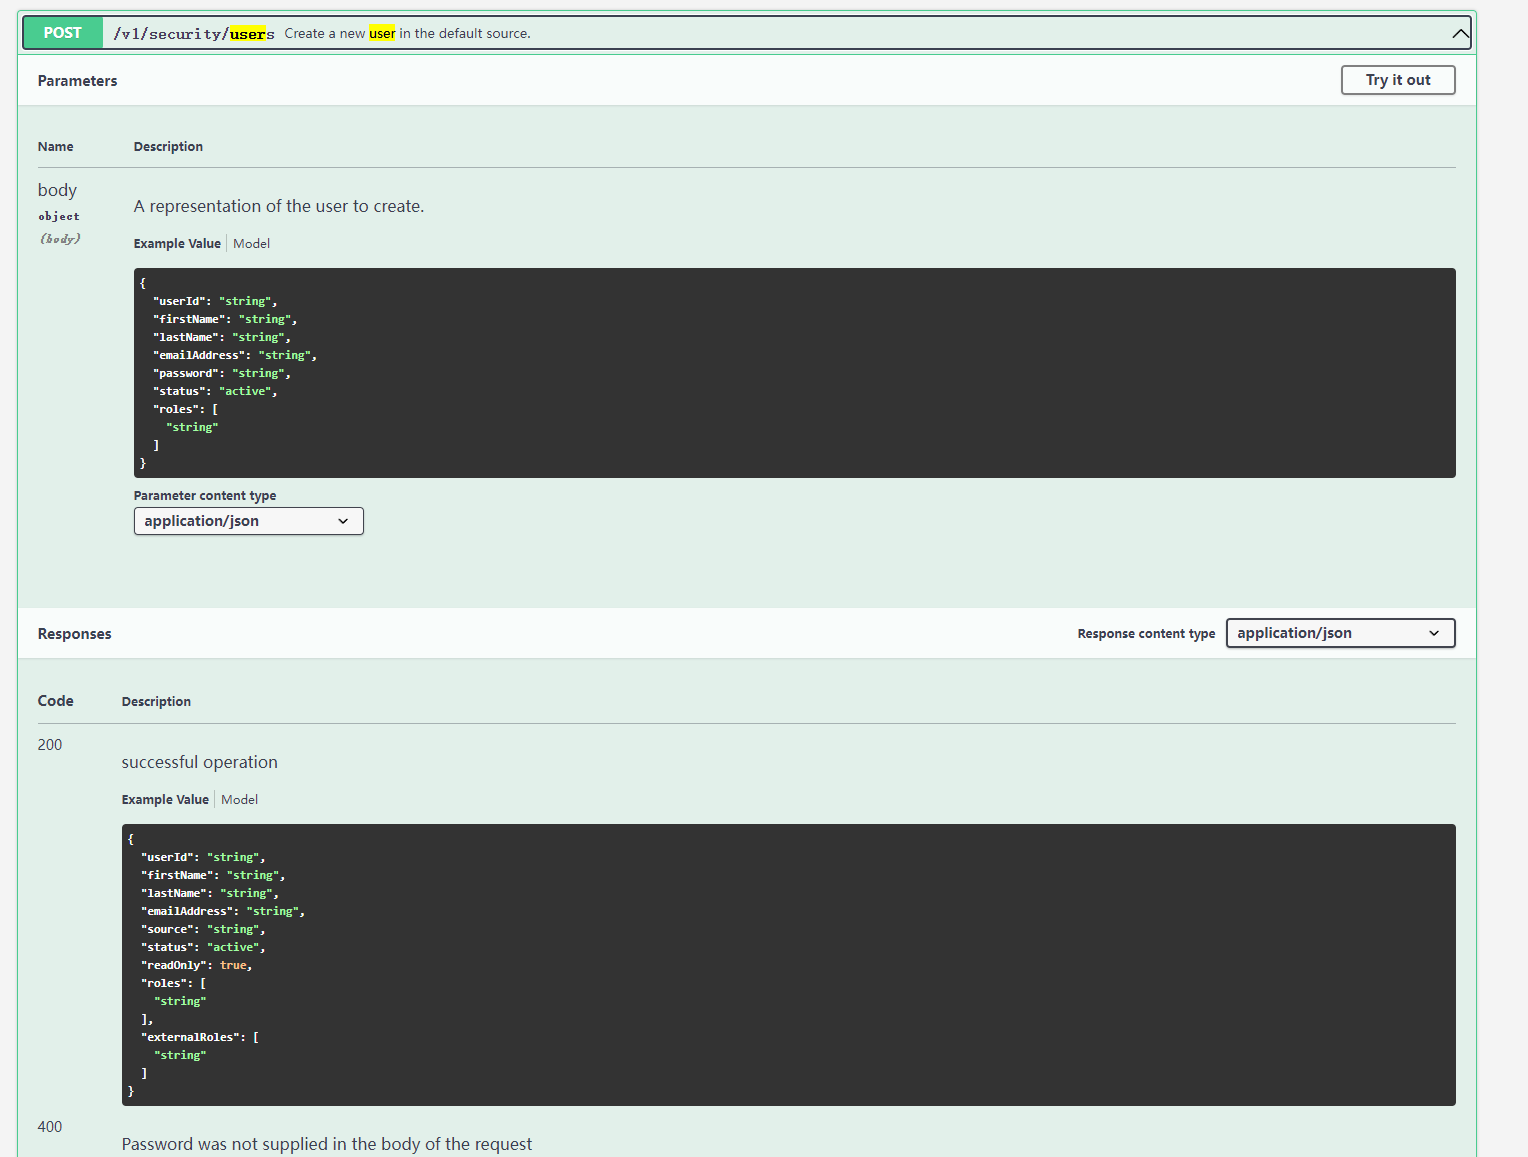
3.2 使用用户api接口
先在Nexus API页面获取test用户的相关信息:
GET请求/v1/security/users接口,并将userid参数设置test。
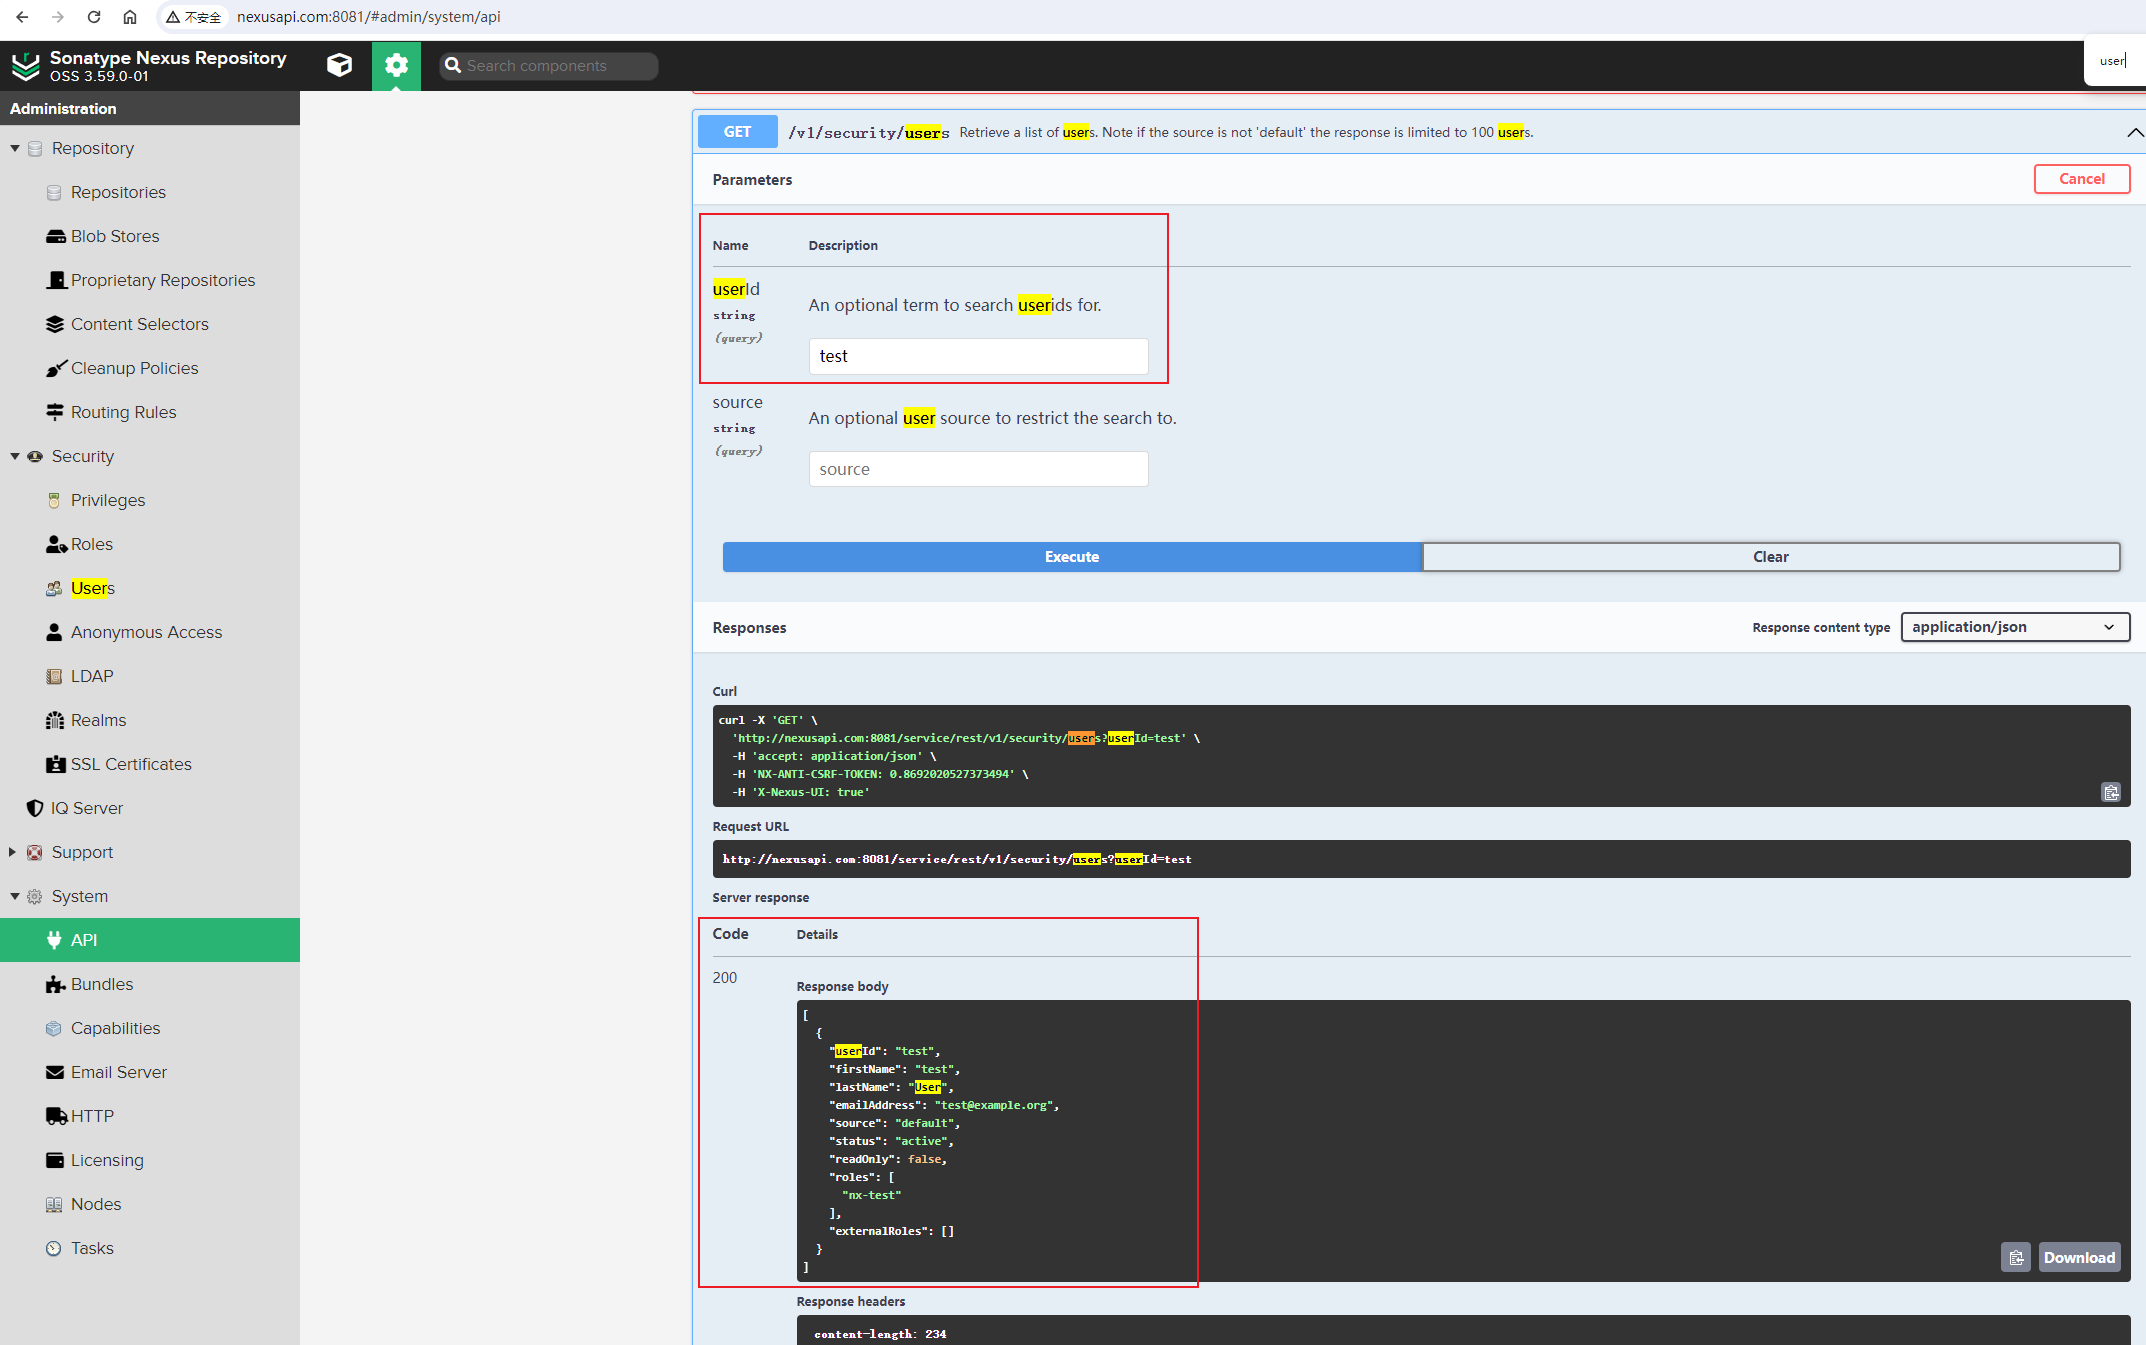
请求的返回信息如下:
1
2
3
4
5
6
7
8
9
10
11
12
13
14
15
| [
{
"userId": "test",
"firstName": "test",
"lastName": "User",
"emailAddress": "test@example.org",
"source": "default",
"status": "active",
"readOnly": false,
"roles": [
"nx-test"
],
"externalRoles": []
}
]
|
在 nexus_api/config文件夹下创建user.json配置文件,其内容如下:
1
2
3
4
5
6
7
8
9
10
11
| {
"userId": "devops",
"firstName": "devops",
"lastName": "User",
"emailAddress": "devops@example.org",
"password": "123456",
"status": "active",
"roles": [
"nx-devops"
]
}
|
::: warning 注意
user.json配置文件中定义的"password": "123456",密码信息并不需要做加密,是原始密码信息,不要将你的密码推送到github上去了!!
:::
创建用户主要是增加了以下代码:
1
2
3
4
5
6
7
8
| def create_user(self):
"""创建用户"""
logger.info('创建用户')
user_file = f'{CONFIG_DIR}/user.json'
payload = self.load_json_config_file(json_file=user_file)
api = f'/v1/security/users'
self.curl(api=api, method='POST', payload=payload)
logger.success(f'成功创建用户')
|
3.3 创建角色和用户
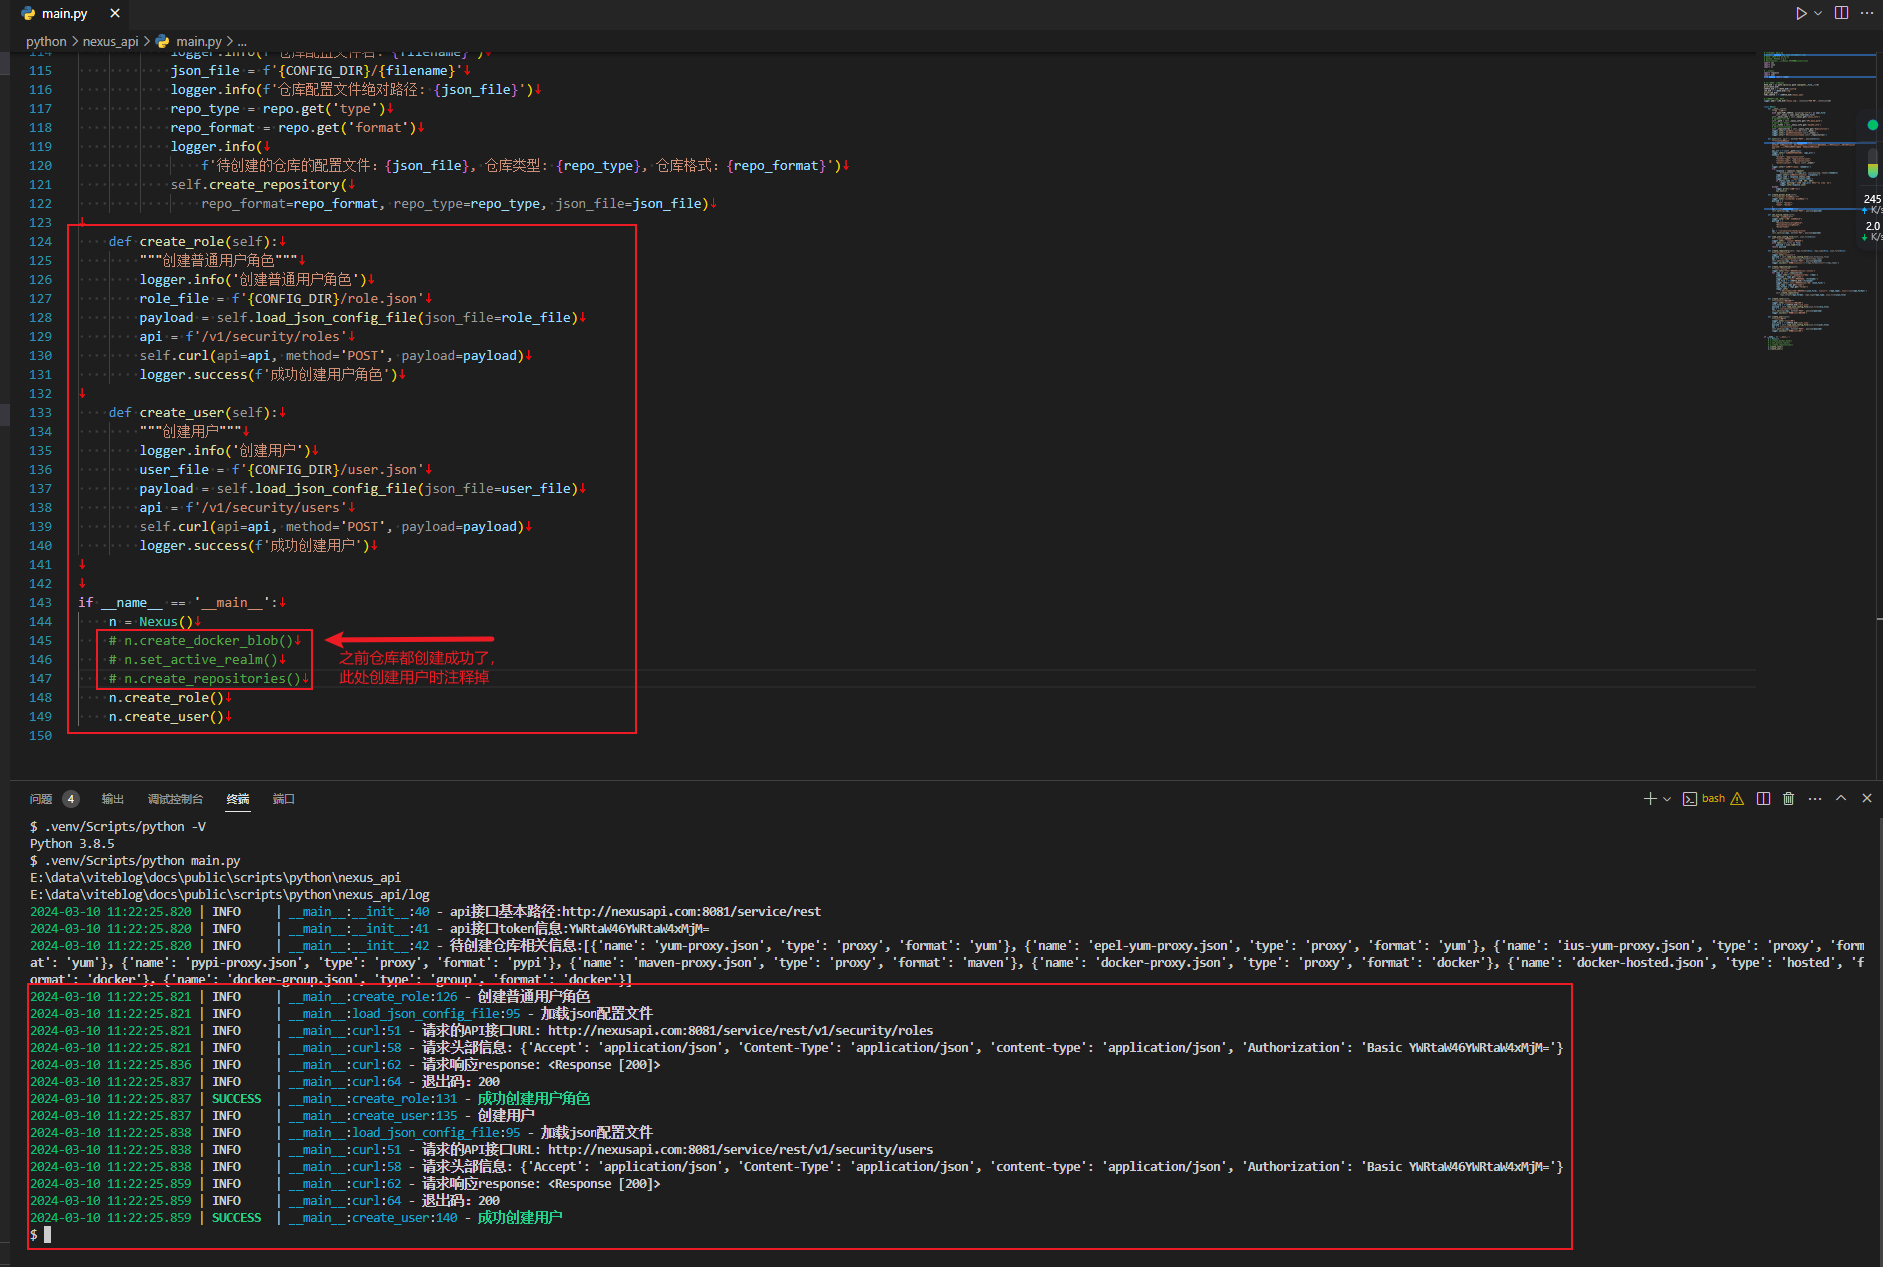
创建角色和用户时,执行Python脚本效果图:
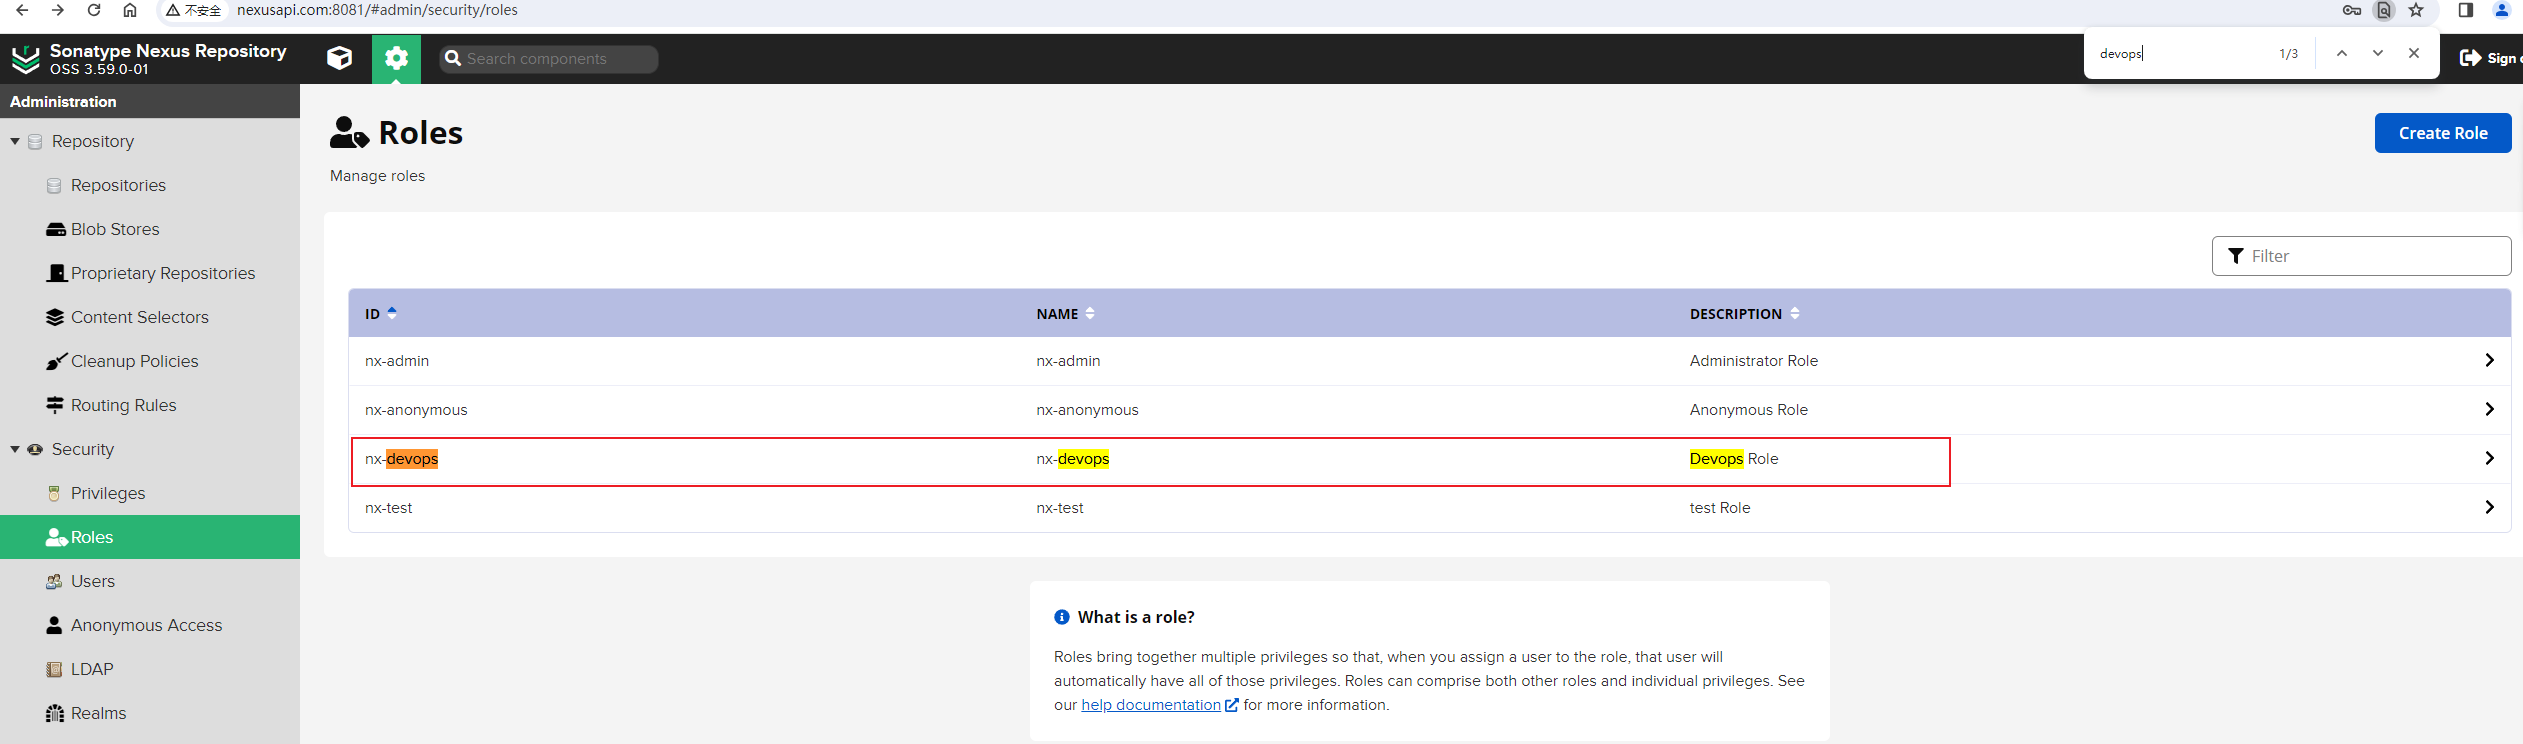
刚创建的nx-devops角色:
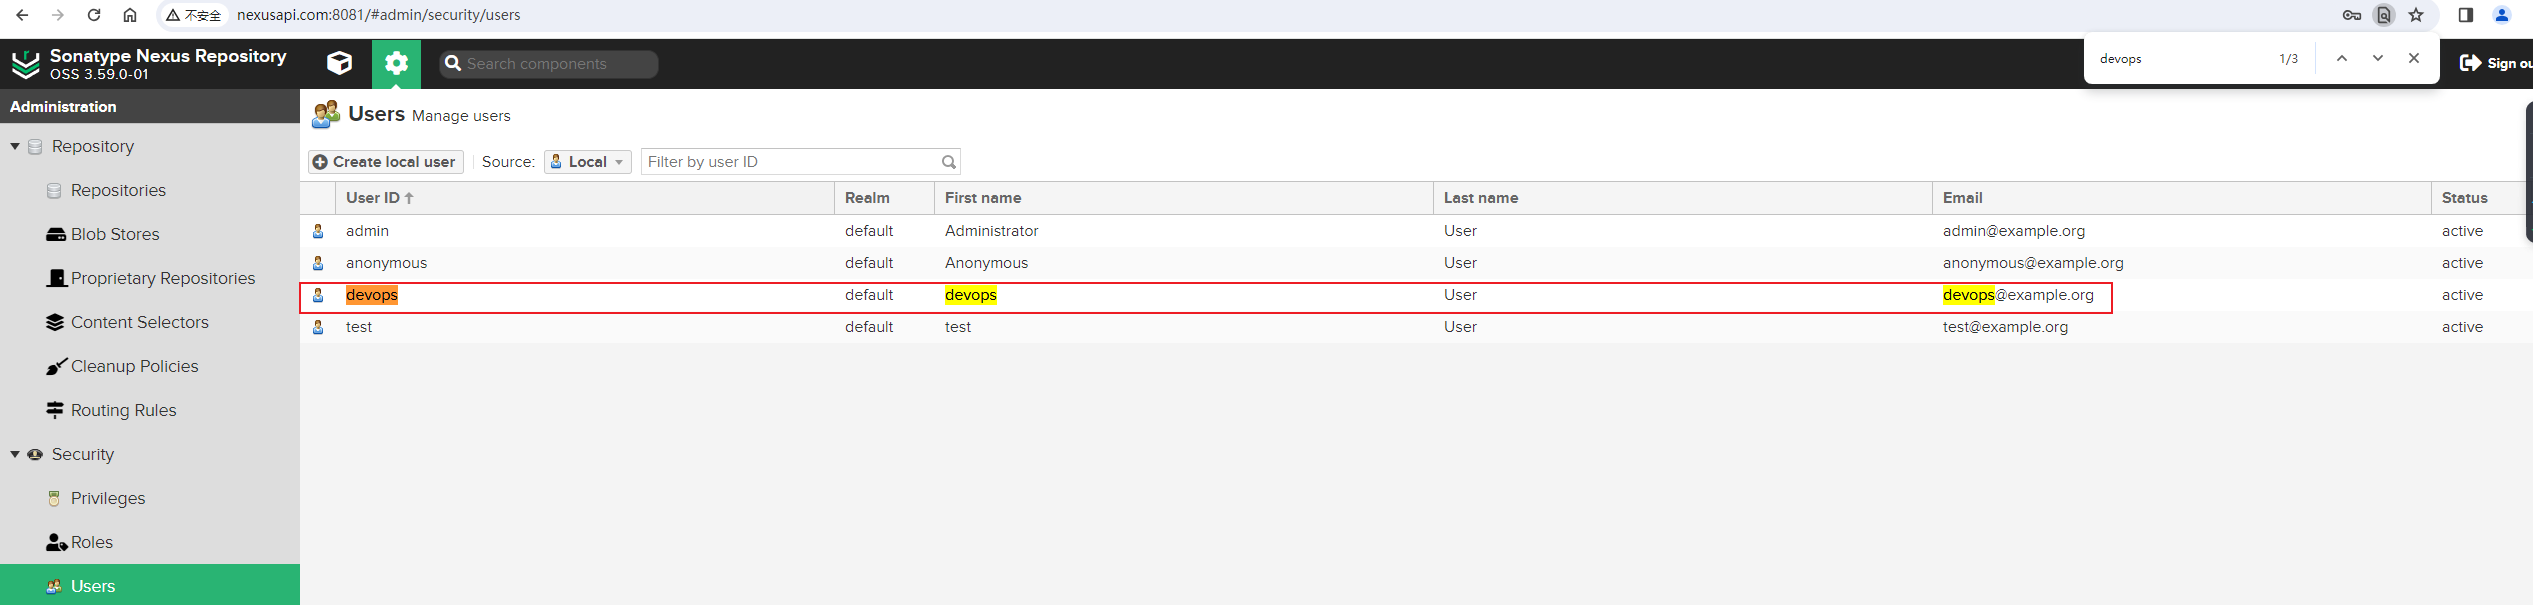
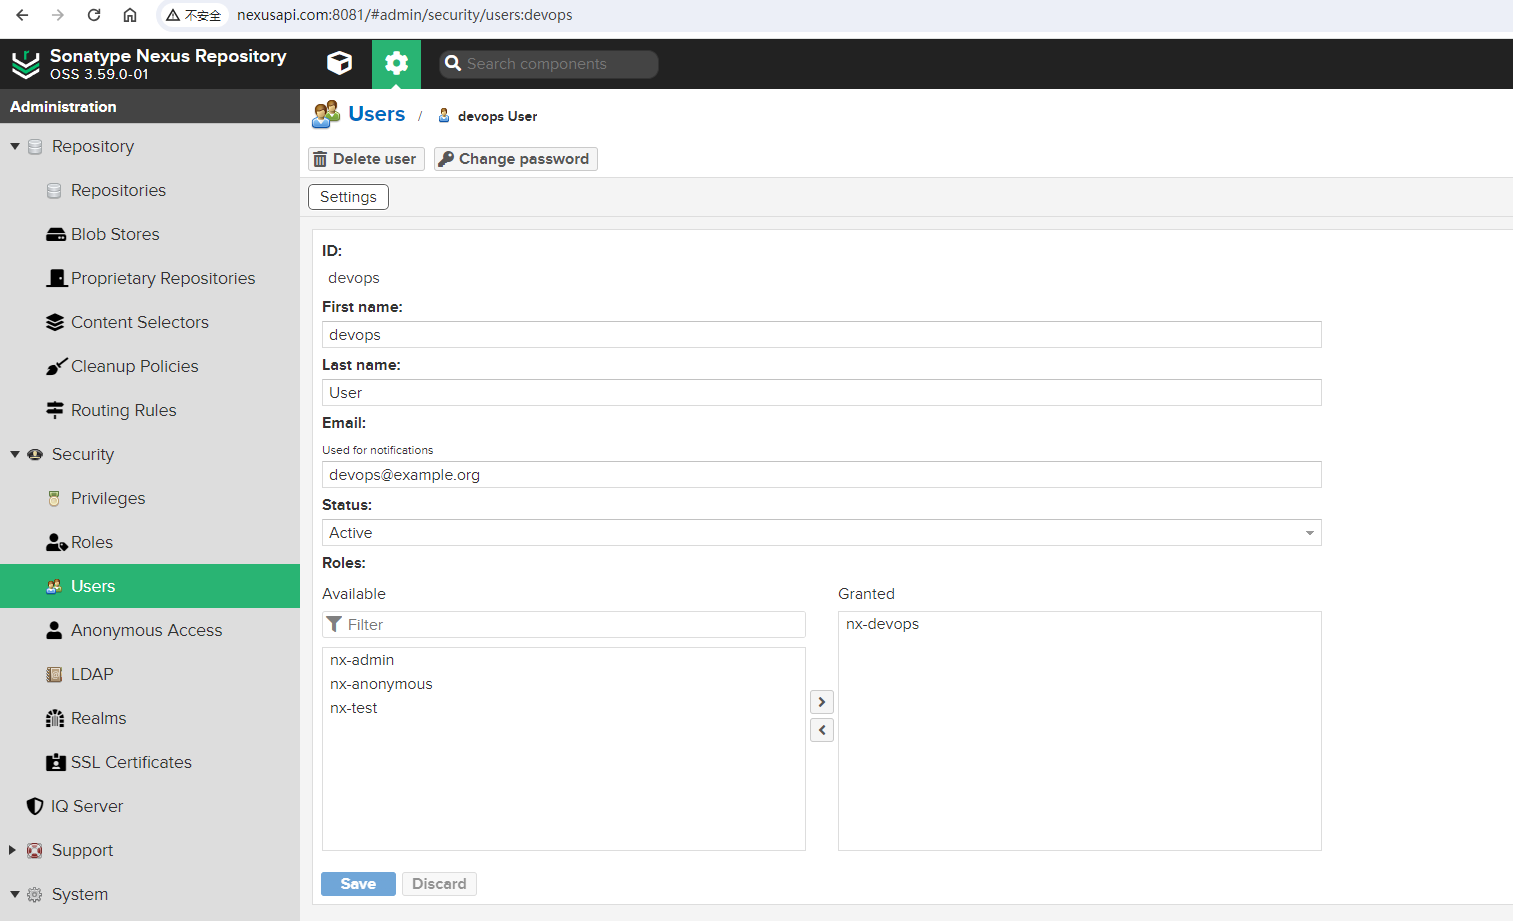
刚创建的devops角色:
优化后的main.py文件内容如下:
1
2
3
4
5
6
7
8
9
10
11
12
13
14
15
16
17
18
19
20
21
22
23
24
25
26
27
28
29
30
31
32
33
34
35
36
37
38
39
40
41
42
43
44
45
46
47
48
49
50
51
52
53
54
55
56
57
58
59
60
61
62
63
64
65
66
67
68
69
70
71
72
73
74
75
76
77
78
79
80
81
82
83
84
85
86
87
88
89
90
91
92
93
94
95
96
97
98
99
100
101
102
103
104
105
106
107
108
109
110
111
112
113
114
115
116
117
118
119
120
121
122
123
124
125
126
127
128
129
130
131
132
133
134
135
136
137
138
139
140
141
142
143
144
145
146
147
148
149
150
| ## filename: main.py
## author: Zhaohui Mei <mzh.whut@gmail.com>
## date: 2024-3-5 22:51:31
## python: Python 3.8.5
## description: 使用Nexus API快速创建常用仓库
import sys
import json
import os
## 第三方库
import requests
import yaml
from loguru import logger
## 当前文件所在的目录
BASE_DIR = os.path.split(os.path.realpath(__file__))[0]
print(BASE_DIR)
CONFIG_DIR = f'{BASE_DIR}/config'
LOG_DIR = f'{BASE_DIR}/log'
print(LOG_DIR)
YAML_CONFIG = f'{CONFIG_DIR}/nexus.yaml'
## 设置日志路径和日志轮转
logger.add(f'{LOG_DIR}/nexus.log', rotation="500 MB", retention=10)
class Nexus:
def __init__(self):
"""构造函数"""
with open(YAML_CONFIG, encoding='utf-8') as yaml_file:
self._nexus = yaml.safe_load(yaml_file)
self._nexus_info = self._nexus.get('nexus_info')
# api接口基本路径
self._path = self._nexus_info.get('API_base_path')
# nexus api token
self._token = self._nexus_info.get('base64_info')
# 待创建仓库相关信息
self._repositories = self._nexus_info.get('Repositories')
logger.info(f'api接口基本路径:{self._path}')
logger.info(f'api接口token信息:{self._token}')
logger.info(f'待创建仓库相关信息:{self._repositories}')
def curl(self, api='', method='POST', payload=None):
"""自定义请求方法
api: api接口信息,如`/v1/blobstores/file`
method: 请求方法,由于大部分接口都是创建仓库,因此默认使用POST方法,也可以GET方法等
payload: 使用POST请求时,需要传输的json数据信息
"""
api_url = f'{self._path}{api}'
logger.info(f'请求的API接口URL: {api_url}')
headers = {
"Accept": "application/json",
"Content-Type": "application/json",
"content-type": "application/json",
"Authorization": f"Basic {self._token}"
}
logger.info(f'请求头部信息: {headers}')
try:
response = requests.request(
method=method, url=api_url, json=payload, headers=headers)
logger.info(f'请求响应response: {response}')
status_code = response.status_code
logger.info(f'退出码:{status_code}')
if status_code not in [200, 201, 204]:
logger.warning(f'请求 {api_url} 接口异常 ,请检查')
logger.info(response.json)
except:
logger.error('发生异常')
sys.exit(1)
def create_docker_blob(self):
"""创建docker blob块对象"""
logger.info('创建docker blob块对象')
payload = {
"path": "docker",
"name": "docker"
}
api = '/v1/blobstores/file'
self.curl(api=api, method='POST', payload=payload)
def set_active_realm(self):
"""设置激活的Realm"""
logger.info('设置激活的Realm')
payload = [
"NexusAuthenticatingRealm",
"NexusAuthorizingRealm",
"DockerToken"
]
api = '/v1/security/realms/active'
self.curl(api=api, method='PUT', payload=payload)
@staticmethod
def load_json_config_file(json_file=None):
"""加载json配置文件"""
logger.info('加载json配置文件')
with open(json_file) as file:
payload = json.load(file)
return payload
def create_repository(self, repo_format=None, repo_type=None, json_file=None):
"""创建单个仓库"""
logger.info('创建仓库')
payload = self.load_json_config_file(json_file=json_file)
api = f'/v1/repositories/{repo_format}/{repo_type}'
self.curl(api=api, method='POST', payload=payload)
logger.success(f'成功创建仓库格式:{repo_format},类型:{repo_type}')
def create_repositories(self):
"""创建多个仓库"""
logger.info('根据配置文件定义创建多个仓库')
for repo in self._repositories:
logger.info(f'当前处理的仓库repo: {repo}')
filename = repo.get('name')
logger.info(f'仓库配置文件名: {filename}')
json_file = f'{CONFIG_DIR}/{filename}'
logger.info(f'仓库配置文件绝对路径: {json_file}')
repo_type = repo.get('type')
repo_format = repo.get('format')
logger.info(
f'待创建的仓库的配置文件:{json_file}, 仓库类型: {repo_type}, 仓库格式:{repo_format}')
self.create_repository(
repo_format=repo_format, repo_type=repo_type, json_file=json_file)
    def create_role(self):
        """创建普通用户角色"""
        logger.info('创建普通用户角色')
        role_file = f'{CONFIG_DIR}/role.json'
        payload = self.load_json_config_file(json_file=role_file)
        api = f'/v1/security/roles'
        self.curl(api=api, method='POST', payload=payload)
        logger.success(f'成功创建用户角色')
def create_user(self):
"""创建用户"""
logger.info('创建用户')
user_file = f'{CONFIG_DIR}/user.json'
payload = self.load_json_config_file(json_file=user_file)
api = f'/v1/security/users'
self.curl(api=api, method='POST', payload=payload)
logger.success(f'成功创建用户')
if __name__ == '__main__':
n = Nexus()
n.create_docker_blob()
n.set_active_realm()
n.create_repositories()
n.create_role()
n.create_user()
|
说明:创建仓库、角色或者用户时,以上代码并没有去判断系统中是否已经存在,原因是Nexus中刚创建的,并没有手动去添加相关的信息。如果你创建的时候,提示400异常的话,有可能是系统中已经存在重复数据。
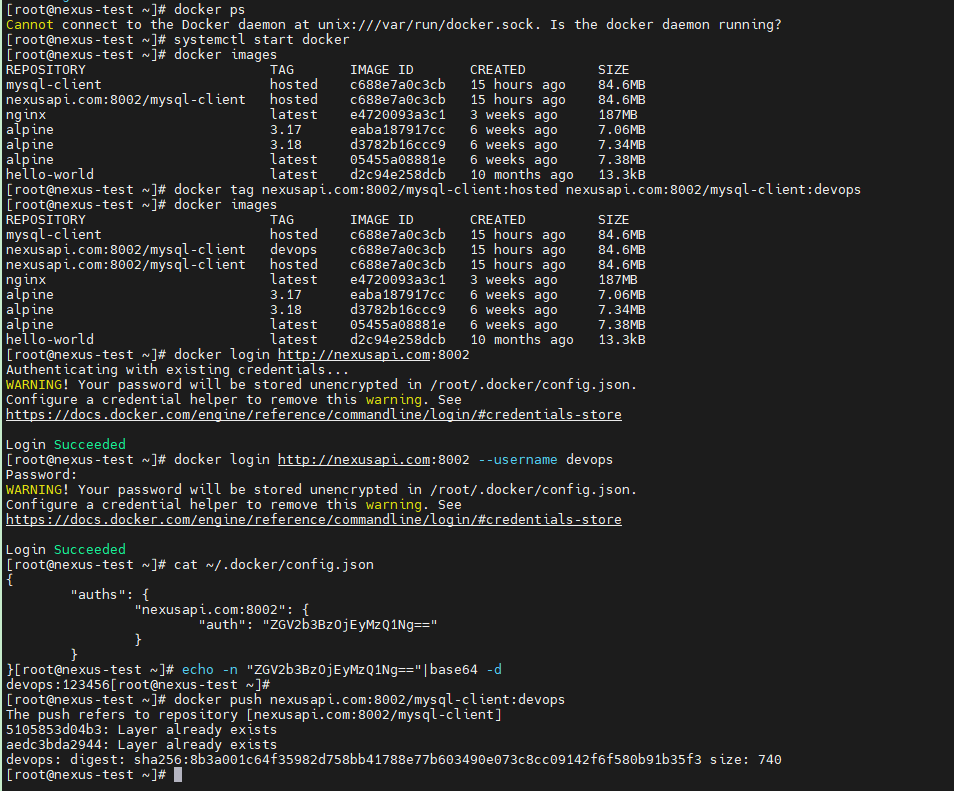
3.4 测试推送
 1
 2
 3
 4
 5
 6
 7
 8
 9
10
11
12
13
14
15
16
17
18
19
20
21
22
23
24
25
26
27
28
29
30
31
32
33
34
35
36
37
38
39
40
41
42
43
44
45
46
47
48
49
50
51
52
53
54
55
56
57
58
59
60
61
62
63
64
65
66
67
68
69
| ## 测试虚拟机启动docker服务
[root@nexus-test ~]# systemctl start docker
## 查看当前镜像
[root@nexus-test ~]# docker images
REPOSITORY TAG IMAGE ID CREATED SIZE
mysql-client hosted c688e7a0c3cb 15 hours ago 84.6MB
nexusapi.com:8002/mysql-client hosted c688e7a0c3cb 15 hours ago 84.6MB
nginx latest e4720093a3c1 3 weeks ago 187MB
alpine 3.17 eaba187917cc 6 weeks ago 7.06MB
alpine 3.18 d3782b16ccc9 6 weeks ago 7.34MB
alpine latest 05455a08881e 6 weeks ago 7.38MB
hello-world latest d2c94e258dcb 10 months ago 13.3kB
## 对镜像打标签
[root@nexus-test ~]# docker tag nexusapi.com:8002/mysql-client:hosted nexusapi.com:8002/mysql-client:devops
## 再次查看镜像信息
[root@nexus-test ~]# docker images
REPOSITORY TAG IMAGE ID CREATED SIZE
mysql-client hosted c688e7a0c3cb 15 hours ago 84.6MB
nexusapi.com:8002/mysql-client devops c688e7a0c3cb 15 hours ago 84.6MB
nexusapi.com:8002/mysql-client hosted c688e7a0c3cb 15 hours ago 84.6MB
nginx latest e4720093a3c1 3 weeks ago 187MB
alpine 3.17 eaba187917cc 6 weeks ago 7.06MB
alpine 3.18 d3782b16ccc9 6 weeks ago 7.34MB
alpine latest 05455a08881e 6 weeks ago 7.38MB
hello-world latest d2c94e258dcb 10 months ago 13.3kB
## 登陆到远程docker-hosted仓库,如果不指定用户名,则会用之前保存的test账号登陆
[root@nexus-test ~]# docker login http://nexusapi.com:8002
Authenticating with existing credentials...
WARNING! Your password will be stored unencrypted in /root/.docker/config.json.
Configure a credential helper to remove this warning. See
https://docs.docker.com/engine/reference/commandline/login/#credentials-store
Login Succeeded
## 指定用户名为devops,再次登陆到远程docker-hosted仓库
## 可以看到登陆成功了
[root@nexus-test ~]# docker login http://nexusapi.com:8002 --username devops
Password:
WARNING! Your password will be stored unencrypted in /root/.docker/config.json.
Configure a credential helper to remove this warning. See
https://docs.docker.com/engine/reference/commandline/login/#credentials-store
Login Succeeded
## 查看保存下来的认证信息
[root@nexus-test ~]# cat ~/.docker/config.json
{
"auths": {
"nexusapi.com:8002": {
"auth": "ZGV2b3BzOjEyMzQ1Ng=="
}
}
}[root@nexus-test ~]#
## 解密加密后的用户名和密码信息,可以看到是devops账号
[root@nexus-test ~]# echo -n "ZGV2b3BzOjEyMzQ1Ng=="|base64 -d
devops:123456[root@nexus-test ~]#
## 推送镜像到远程仓库中,可以看到,推送成功!
[root@nexus-test ~]# docker push nexusapi.com:8002/mysql-client:devops
The push refers to repository [nexusapi.com:8002/mysql-client]
5105853d04b3: Layer already exists
aedc3bda2944: Layer already exists
devops: digest: sha256:8b3a001c64f35982d758bb41788e77b603490e073c8cc09142f6f580b91b35f3 size: 740
[root@nexus-test ~]#
|
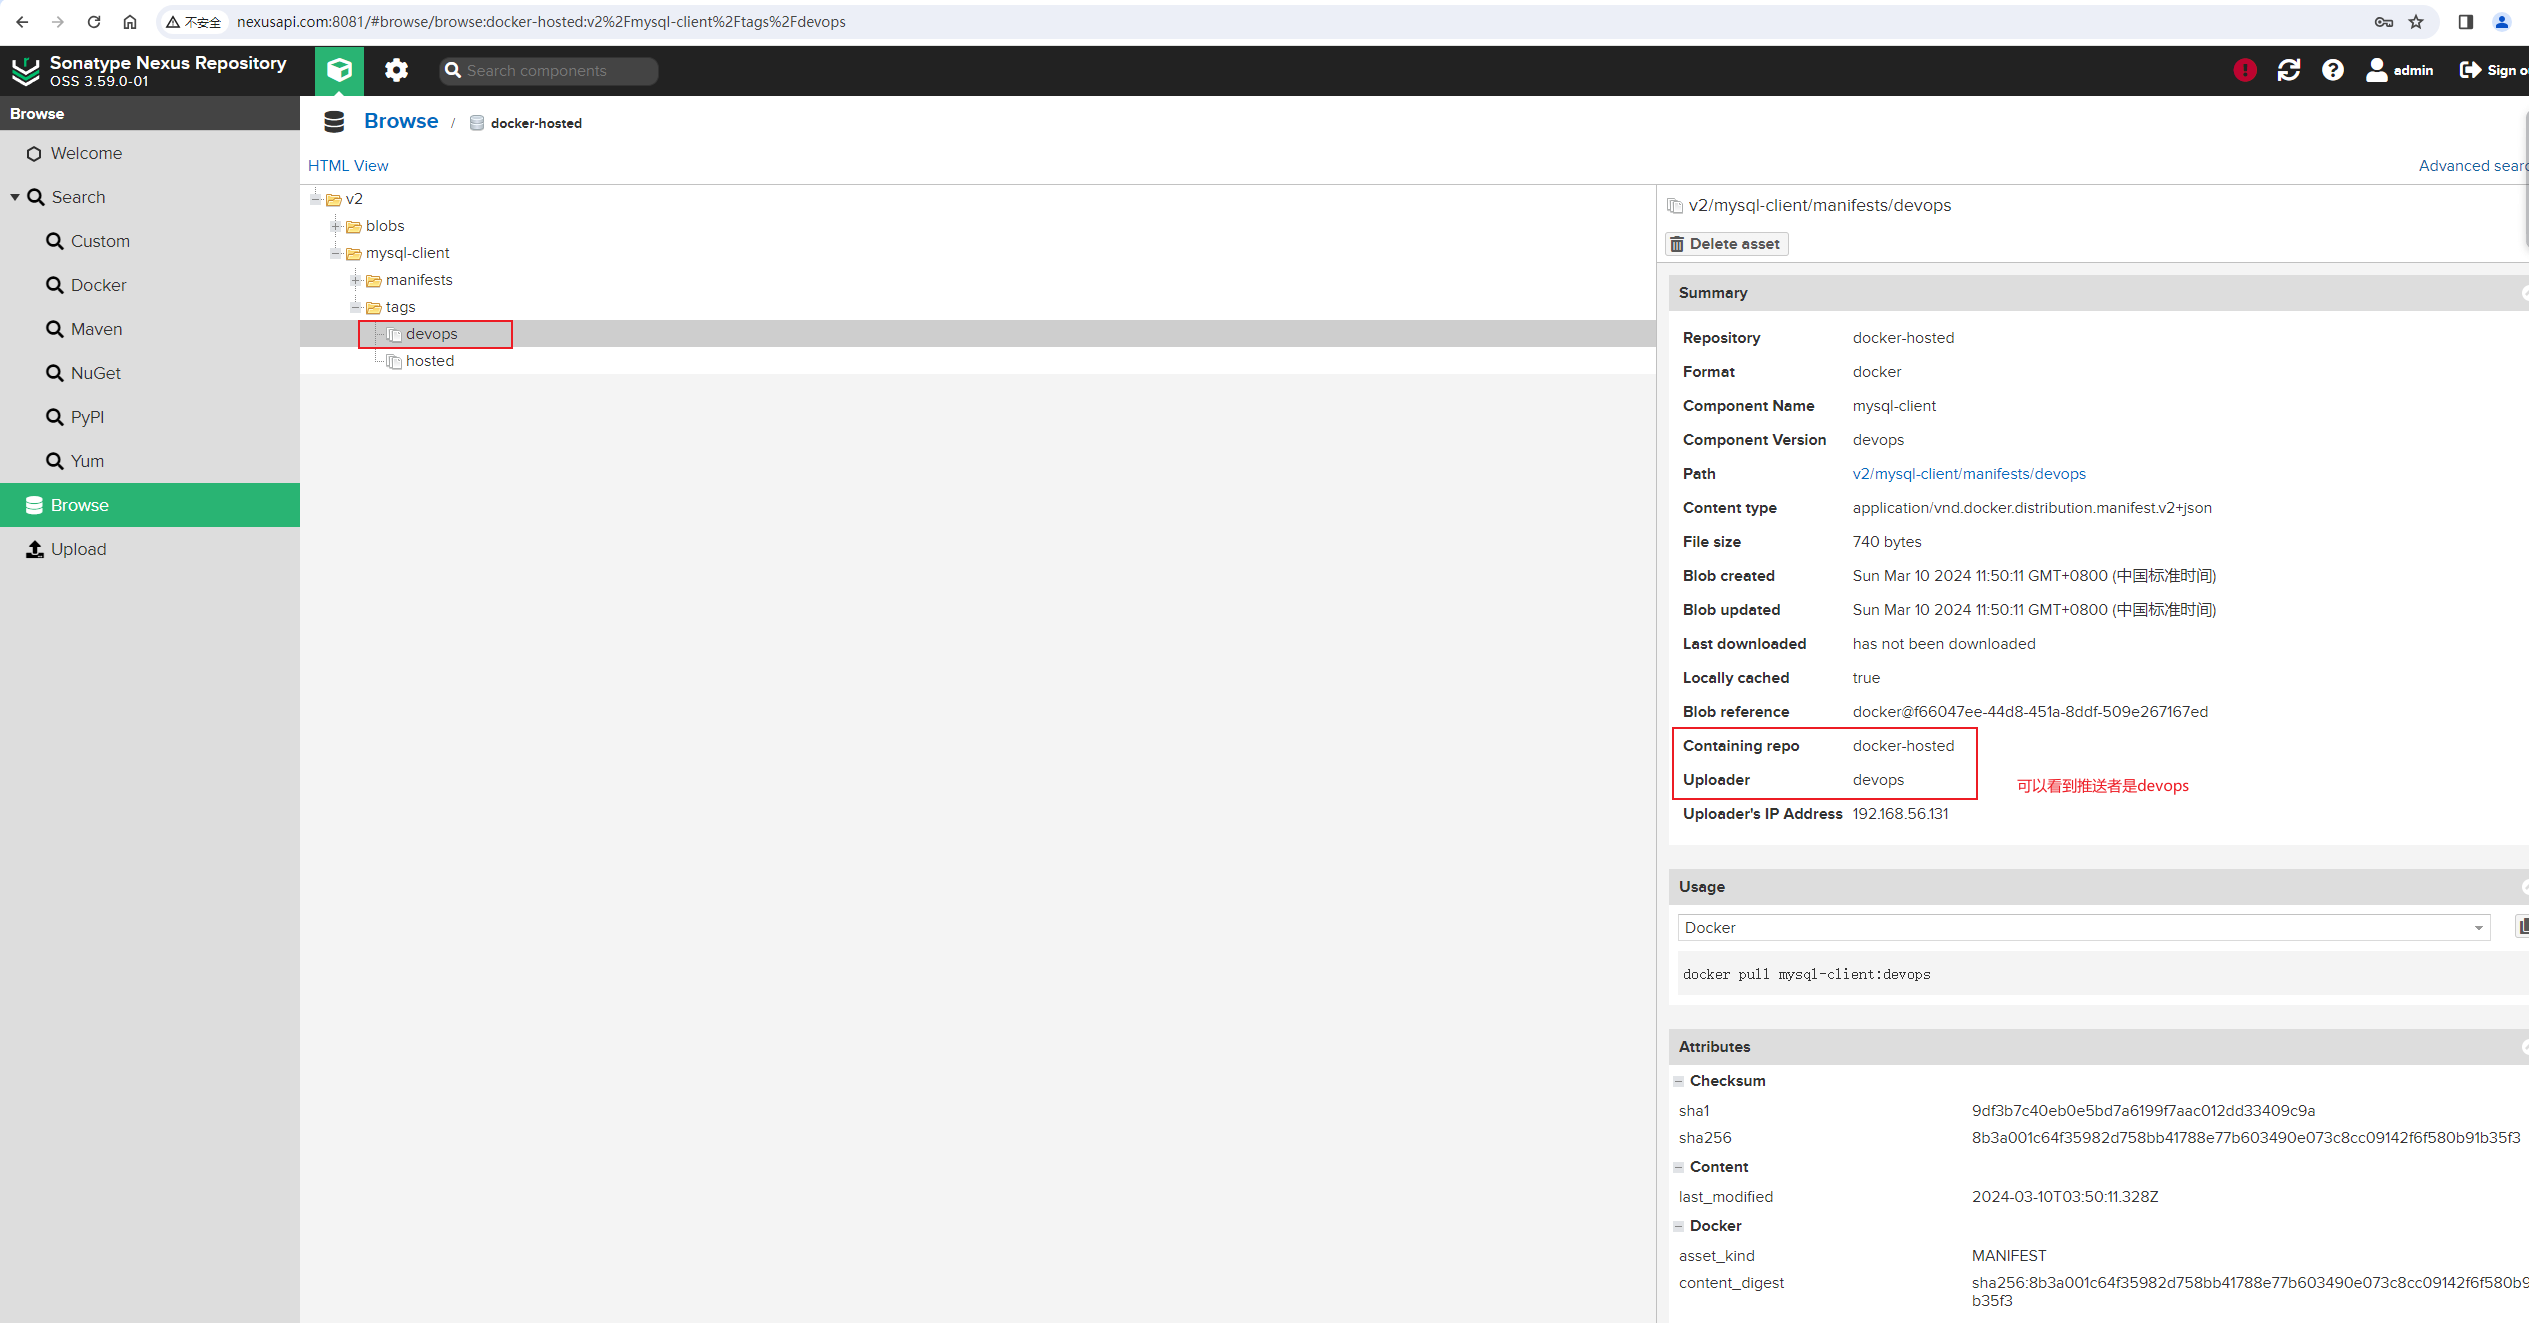
推送效果:
在Nexus Browse浏览器中,可以看到刚才推送的镜像,也可以看到推送人是devops,说明我们通过API接口创建的用户能够正常使用:
到此,通过Nexus API接口快速创建常用仓库并配置用户角色和权限工作已经完成了。后续如果需要快速初始化一个Nexus私有镜像系统,则可以使用以上Python脚本来完成该项工作了。