
编写facts模块
1. 概述
- 在setup事实变量模块中我们可以自定义fact事实变量,但该方式灵活性不是很强,因为需要每台机器上都存在一个那样的文件。
- 本节我们通过编写模块的方式收集facts信息。就是相当于自己写一个功能跟
setup模块类似的模块。 - 如果只是编写facts信息采集,编写流程很简单,只需要按照编写module模块的要求编写即可,唯一要求是在最后需要把所有的facts信息(JSON格式)存储到
ansible_factskey下。 - 官方文档 ansible 2.9版本 Ansible module development: getting started。
- 官方文档ansible 9版本 Developing modules
1.1 VirtualBox虚拟机信息记录
我使用以下虚拟机进行测试。详细可参考 一步一步学role角色-base基础角色配置
| 序号 | 虚拟机 | 主机名 | IP | CPU | 内存 | 说明 |
|---|---|---|---|---|---|---|
| 1 | ansible-master | ansible | 192.168.56.120 | 2核 | 4G | Ansible控制节点 |
| 2 | ansible-node1 | node1 | 192.168.56.121 | 2核 | 2G | Ansible工作节点1 |
| 3 | ansible-node2 | node2 | 192.168.56.122 | 2核 | 2G | Ansible工作节点2 |
| 4 | ansible-node3 | node3 | 192.168.56.123 | 2核 | 2G | Ansible工作节点3 |
2. 创建一个模块的步骤
2.1 官方示例
- 强烈推荐你使用
venv或virtualenv来进行Python开发。(即不影响系统默认环境)
为了创建一个模块,需要做以下步骤:
- Create a
librarydirectory in your workspace, your test play should live in the same directory.- Create your new module file:
$ touch library/my_test.py. Or just open/create it with your editor of choice.- Paste the content below into your new module file. It includes the required Ansible format and documentation, a simple argument spec for declaring the module options, and some example code.
- Modify and extend the code to do what you want your new module to do. See the programming tips and Python 3 compatibility pages for pointers on writing clean and concise module code.
即:
- 在你的工作空间创建一个
library的文件夹,你用于测试的剧本文件也应在这个工作空间目录下。 - 创建模块文件
$ touch library/my_test.py. - 将以下示例代码粘贴到该模块文件中。
- 修改或扩展示例代码,使其能满足你的要求。
我们直接参考官方文档ansible 9版本的示例,编写my_test.py模块文件:
| |
创建一个信息或事实模块,官方有以下要求:
Creating an info or a facts module
Ansible gathers information about the target machines using facts modules, and gathers information on other objects or files using info modules. If you find yourself trying to add
state: infoorstate: listto an existing module, that is often a sign that a new dedicated_factsor_infomodule is needed.In Ansible 2.8 and onwards, we have two type of information modules, they are
*_infoand*_facts.If a module is named
_facts, it should be because its main purpose is returningansible_facts. Do not name modules that do not do this with_facts. Only useansible_factsfor information that is specific to the host machine, for example network interfaces and their configuration, which operating system and which programs are installed.Modules that query/return general information (and not
ansible_facts) should be named_info. General information is non-host specific information, for example information on online/cloud services (you can access different accounts for the same online service from the same host), or information on VMs and containers accessible from the machine, or information on individual files or programs.Info and facts modules, are just like any other Ansible Module, with a few minor requirements:
- They MUST be named
something_infoorsomething_facts, wheresomethingis singular.- Info
*_infomodules MUST return in the form of the result dictionary so other modules can access them.- Fact
*_factsmodules MUST return in theansible_factsfield of the result dictionary so other modules can access them.- They MUST support check_mode.
- They MUST NOT make any changes to the system.
- They MUST document the return fields and examples.
The rest is just like creating a normal module.
大意是:
- Ansible通过facts事实模块,可以收集目标主机上面的信息,也可以使用info信息模块来获取其他对象或文件。
- Ansible 2.8之后,就有两种类型的信息模块,一种是
*_info,另一种是*_facts。 - 如是是
*_facts模块,则是事实变量模块,返回值应该是ansible_facts。 - 它们要支持检查模式;不能对系统产生变更;必须包含返回值。
我们先不管上面这些,直接看官方文档后面的内容。
2.2 校验模块
校验模块大致可分为以下几个步骤:
- 使用远程工作节点校验你的模块。
- 使用Ansible控制节点校验你的模块。
- 不通过Ansible来校验模块使用的Python文件。
- 通过playbook剧本文件来校验模块。
2.2.1 使用Ad-hoc命令测试-使用远程工作节点校验模块
最简单的测试方法是使用ansible 的Ad-hoc命令:
| |
我们来测试一下。
先看一下相关的文件:
| |
library/my_test.py目录的文件内容就是官方示例的内容。我未作任务修改。
直接按官方给定的命令来执行,注意,执行时,将remotehost换成-i base_hosts.ini all:
| |
可以看到,剧本正常执行了,且有输出。三个工作节点输出结果是一样的。
2.2.2 使用Ad-hoc命令测试-使用Ansible控制节点校验模块
直接使用Ansible控制节点校验:
执行下面这个命令即可:
| |
我实际测试下:
| |
可以看到, 除了没有ansible_facts信息,其他信息和使用工作节点测试是一样的。
除了使用ANSIBLE_LIBRARY=./library来指定模块目录,也可以通过-M参数来指定模块目录,示例如下:
| |
和上面使用ANSIBLE_LIBRARY=./library来指定模块目录结果是一样的。
2.2.3 不通过Ansible命令直接校验python文件
创建参数json配置文件,然后查看其内容:
| |

然后直接执行python脚本:
| |
实际执行下:
| |
可以看到,输出与官方示例稍微有些差异。但也能正常输入。
2.2.4 使用剧本测试模块
创建testmod.yml剧本文件 ,并加入以下内容:
| |
查看并执行剧本:
| |
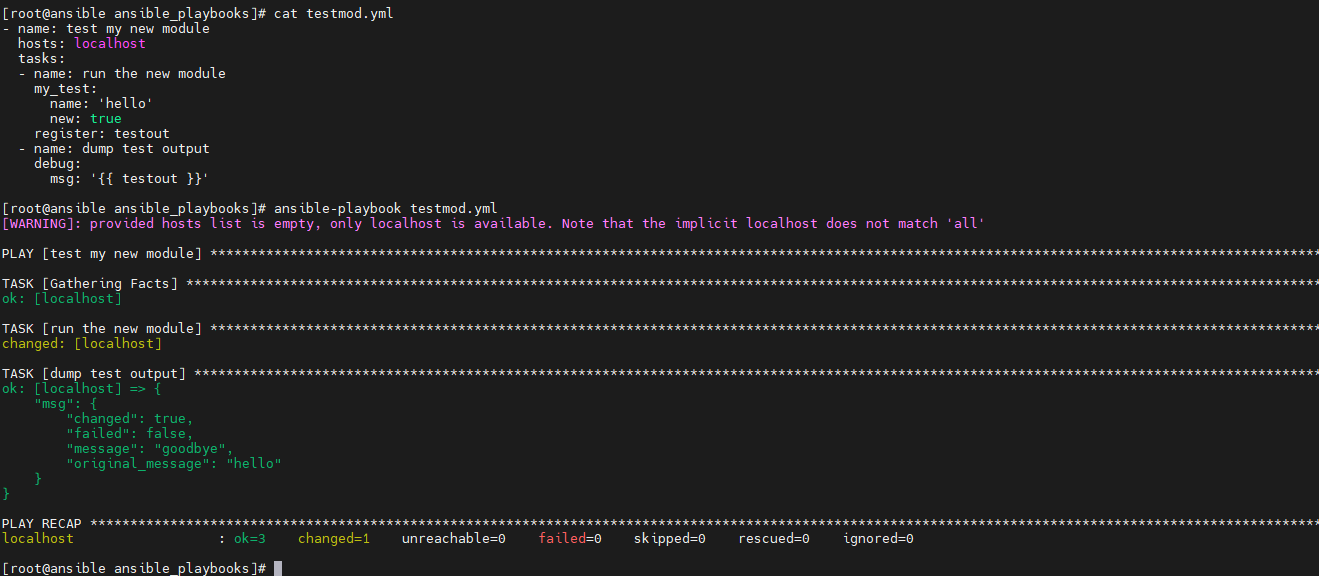
可以看到,剧本成功执行!!
注意,最后输出的msg中多出的"failed": false,是在使用register: testout注册变量时,Ansible自动加入的信息。 Ansible 中的 register 关键字用于注册任务的输出,以便后续的任务可以使用这些输出。当你在 Ansible 中使用 register 关键字时,输出通常包含 failed、changed、end 等字段,以表示任务的状态。
调试通了官方示例代码,下一步就是改变测试逻辑,弄清示例代码每行代码的含义,然后再来写自己的模块。
2.3 示例模块剖析
下面我们对示例模块进行深度剖析和修改测试。
首先对示例代码加上中文注释,便于理解:
| |
2.3.1 获取模板帮助信息
主要使用ansible-doc命令,先看一下这个使用的帮助信息:
| |
我们主要关注以下几个参数:
-M MODULE_PATH, --module-path MODULE_PATH,指定模块路径。-s, --snippet, 显示指定插件的剧本片段。-j, --json,以json格式输出。
2.3.1.1 获取模块剧本片段
我们来测试一下:
| |
可以看到,在-M library指定了模块路径为libraray,并指定-s获取剧本版本后,能够正常输出剧本版本信息。
2.3.1.2 获取json格式输出
增加-j参数,则会以json格式输出:
| |
使用jq命令会使json字符串更美观,效果如下:
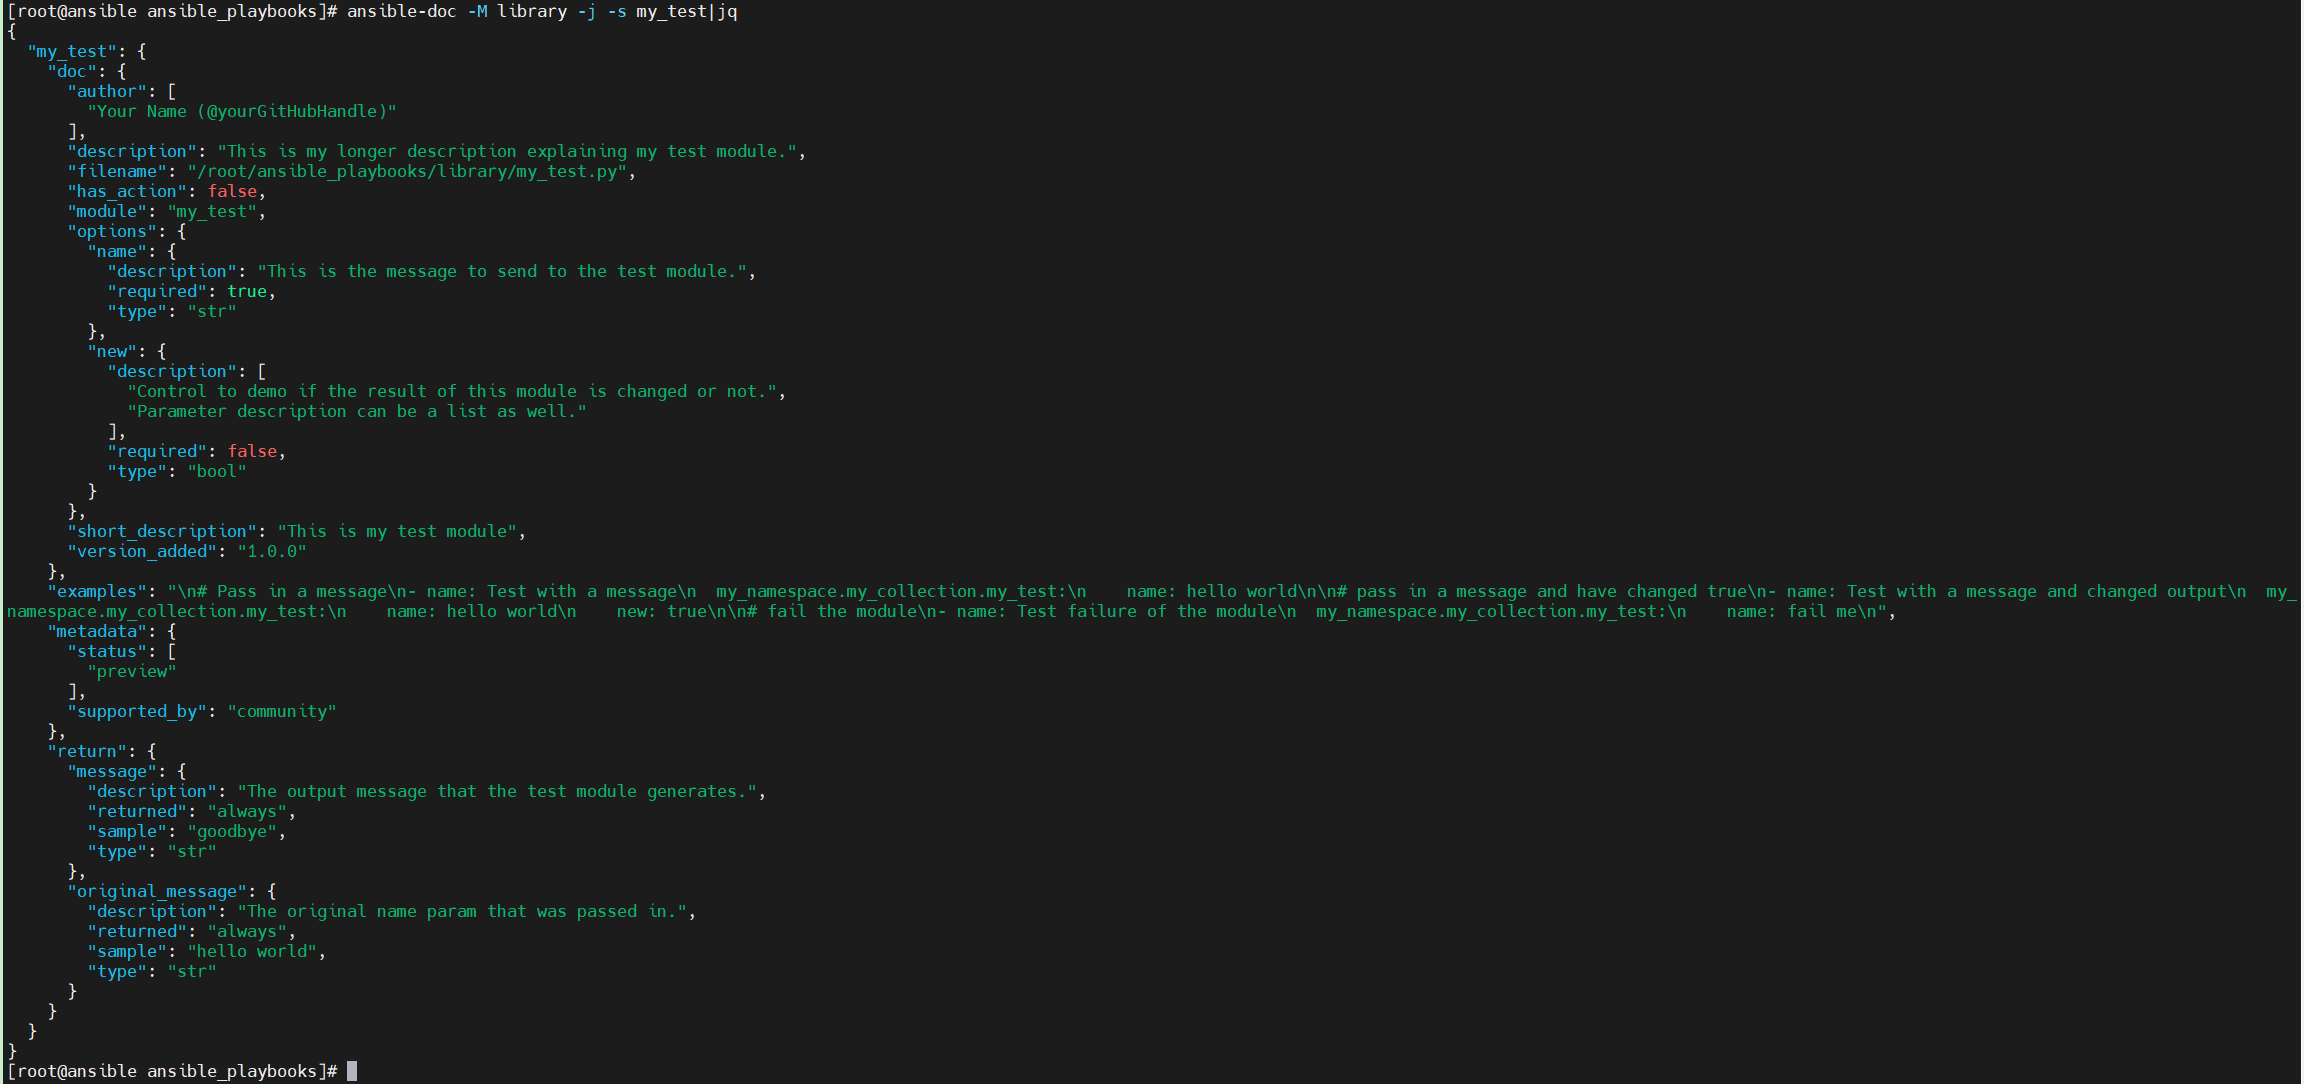
可以看到,以json格式输出,可以获取到更详细的帮助信息。而这些信息则是从我们模块源文件的DOCUMENTATION、EXAMPLES和RETURN这几个关键定义中获取的。
2.3.2 测试模块传参
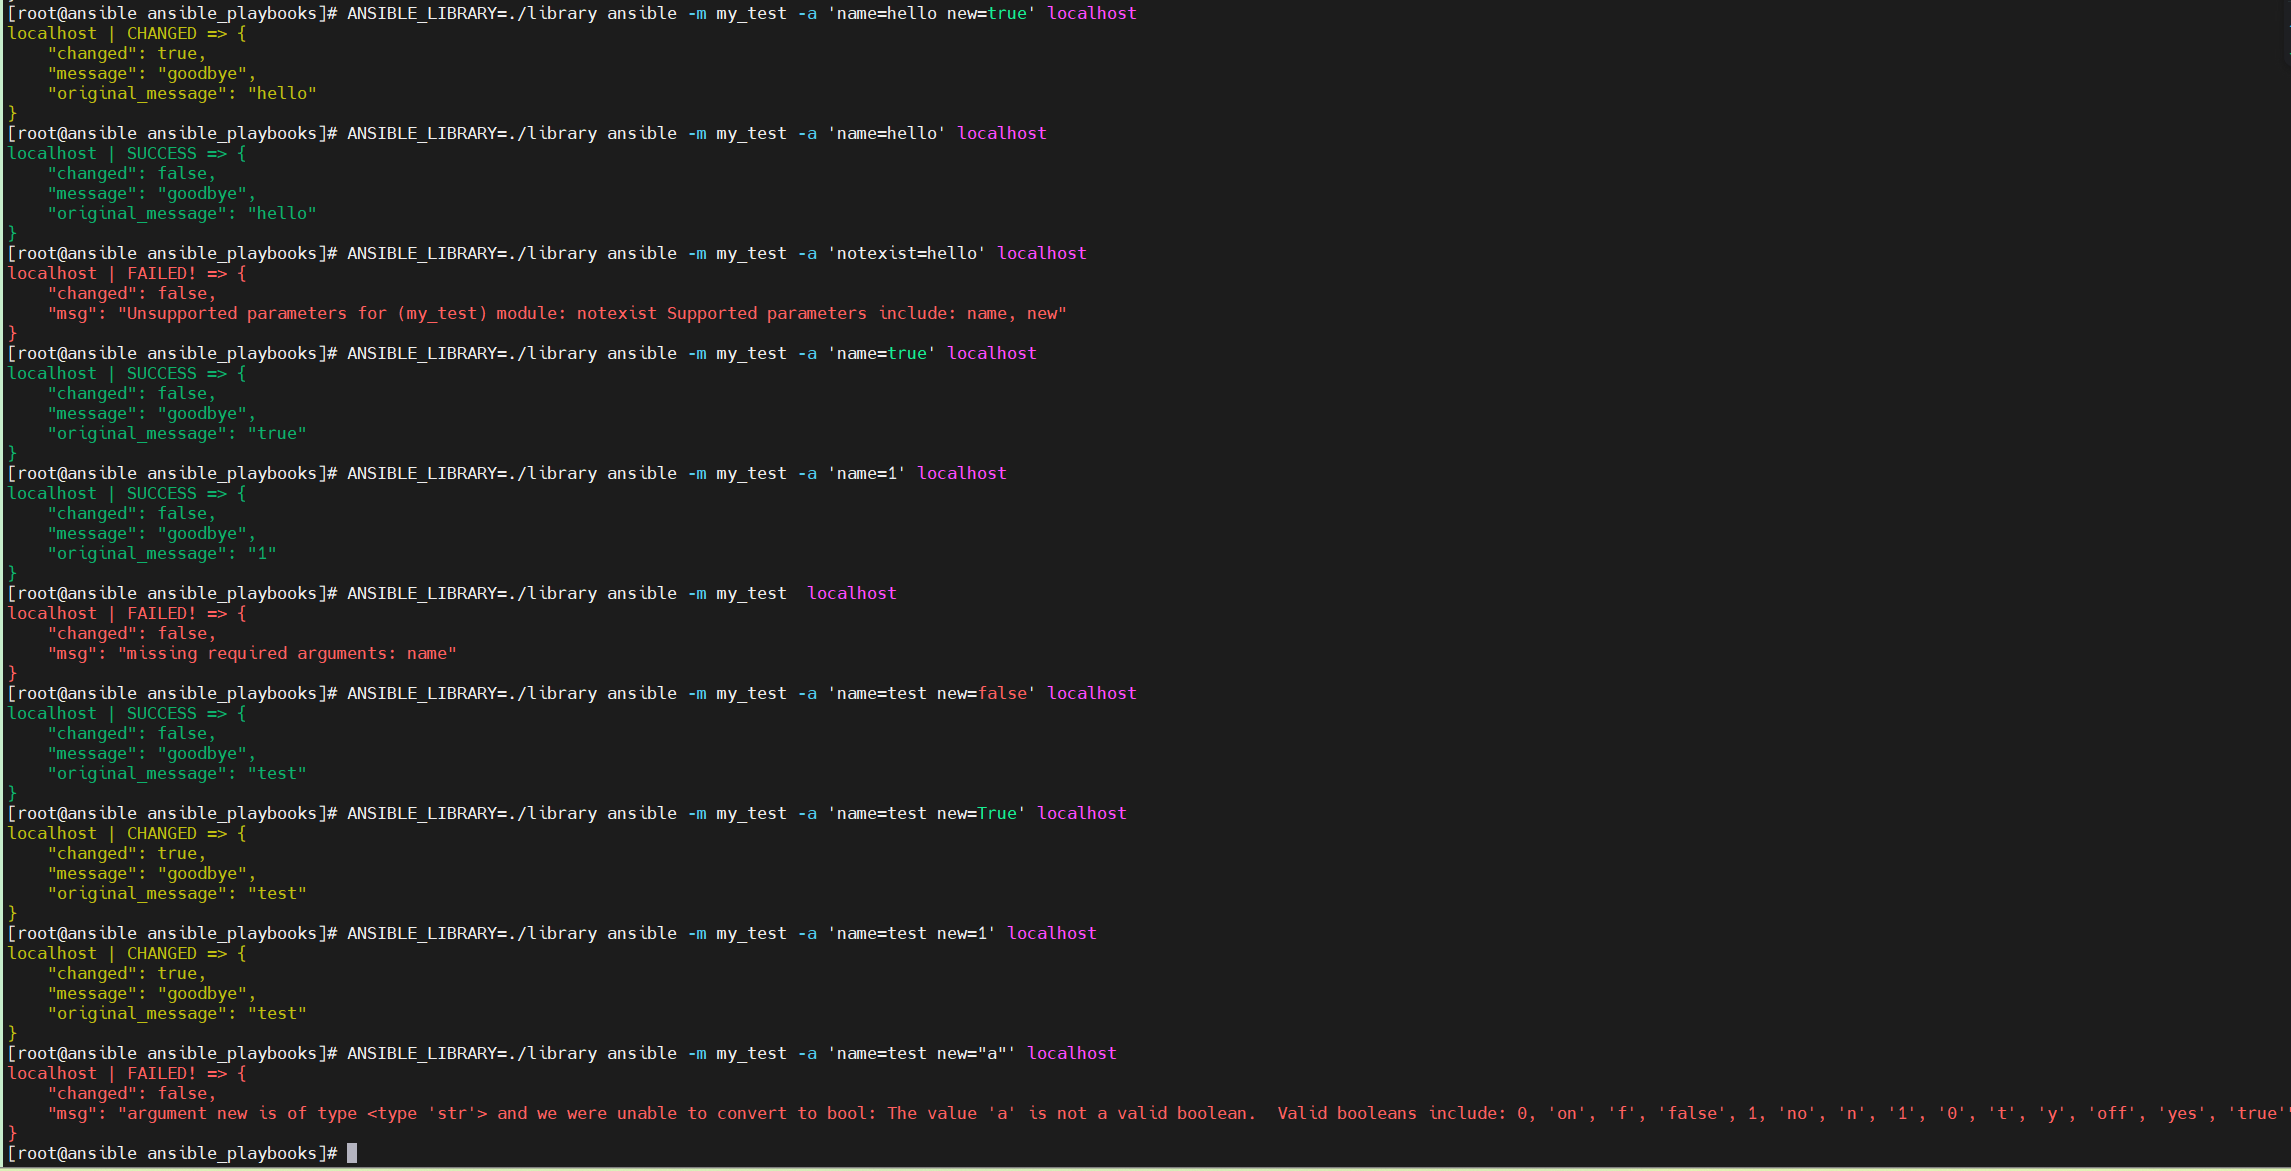
由以下代码:
| |
可以知道,模块支持两个参数:name和new。
在2.2小节中,用了几种方法来测试模块是否能够正常使用。此处为了方便测试,此处使用2.2.2中Ad-hoc命令来测试。
| |
此时不需要与远程工作节点交换。
2.3.2.1 传参测试
现在来对比传递不同的参数的输出结果:
| |
2.3.2.2 异常测试
测试异常:
| |
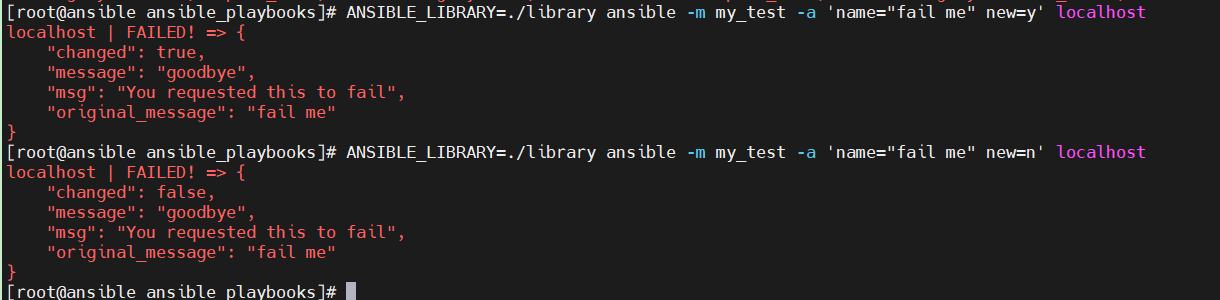
此时可以看到,当传输name="fail me"参数后,任务执行失败。
2.3.2.3 检查模式测试
测试检查模式,只用在命令后加上-C参数:
| |
可以看到,此时模块并没有获取我们传输的参数,直接输出了changed为false。
3. 创建facts模块
3.1 编写自定义facts模块
facts模块是在普通模块的基础上,有以下要求:
模块命名为
*_facts。返回值是
ansible_facts。
为了编写一个我自己的facts模块,对示例Python文件进行修改。
先复制示例文件:
| |
然后修改模块文件:
| |
然后执行测试:
| |
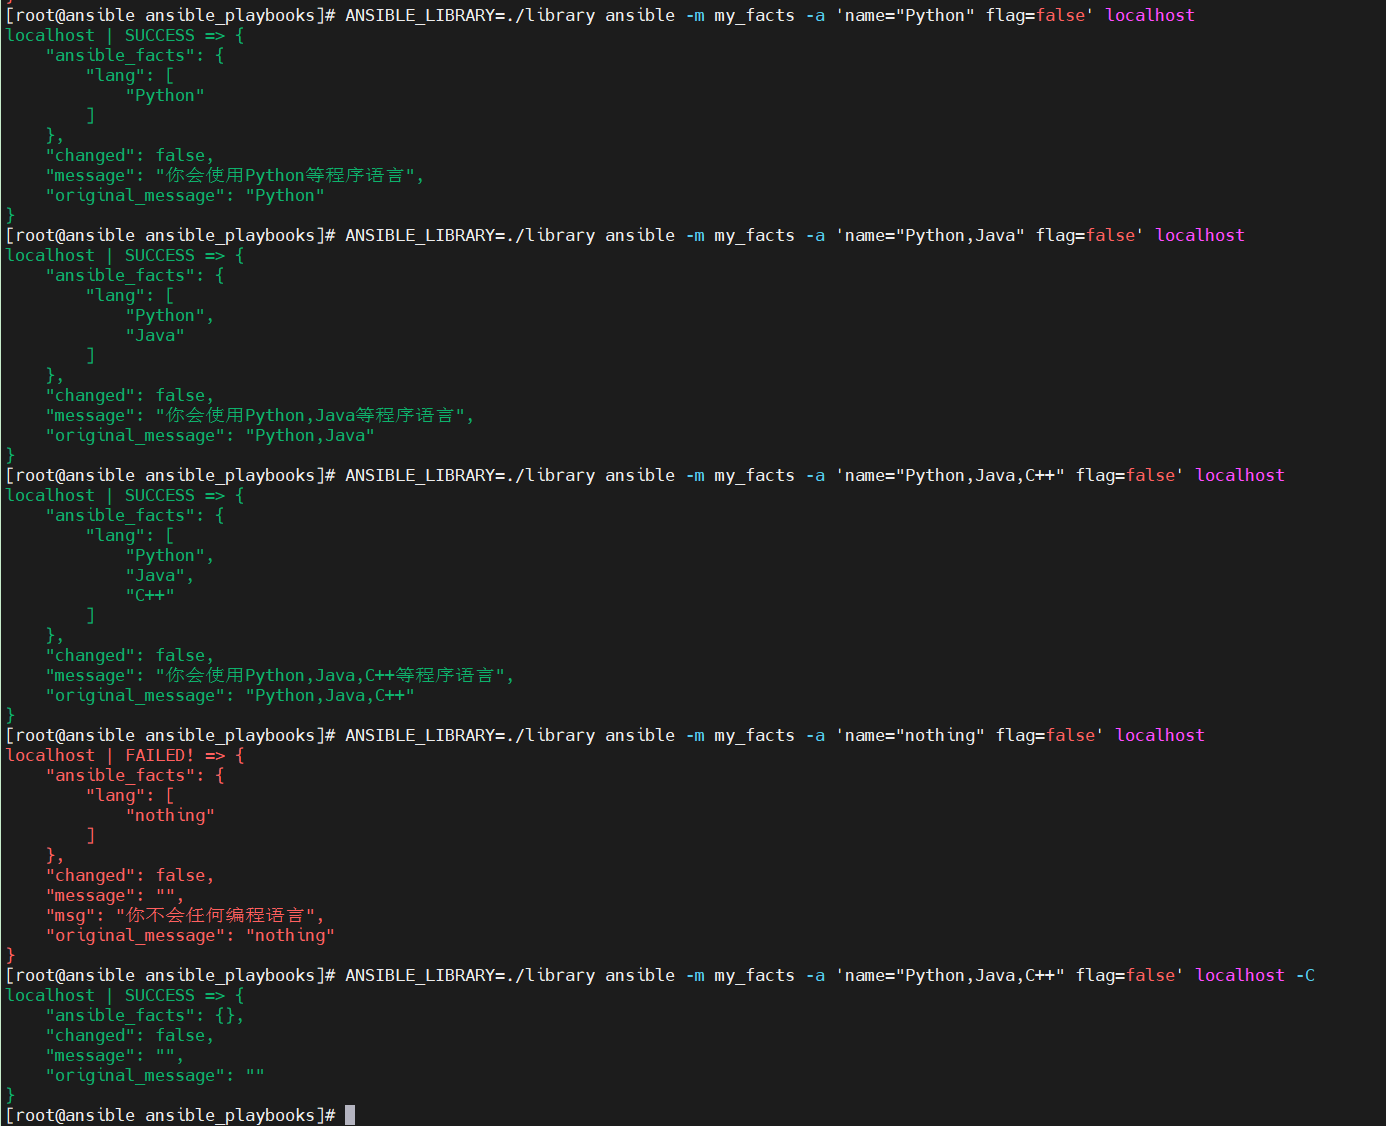
可以看到,有事实变量输出。能正常执行我定义的模块里面的逻辑判断。说明自定义模块能正常工作。
3.2 在剧本中使用自定义facts模块
编写剧本文件test_my_module.yml:
| |
并在templates目录下创建模板文件facts_module.j2:
| |
检查这两个文件:
| |
执行剧本:
| |
效果图如下:
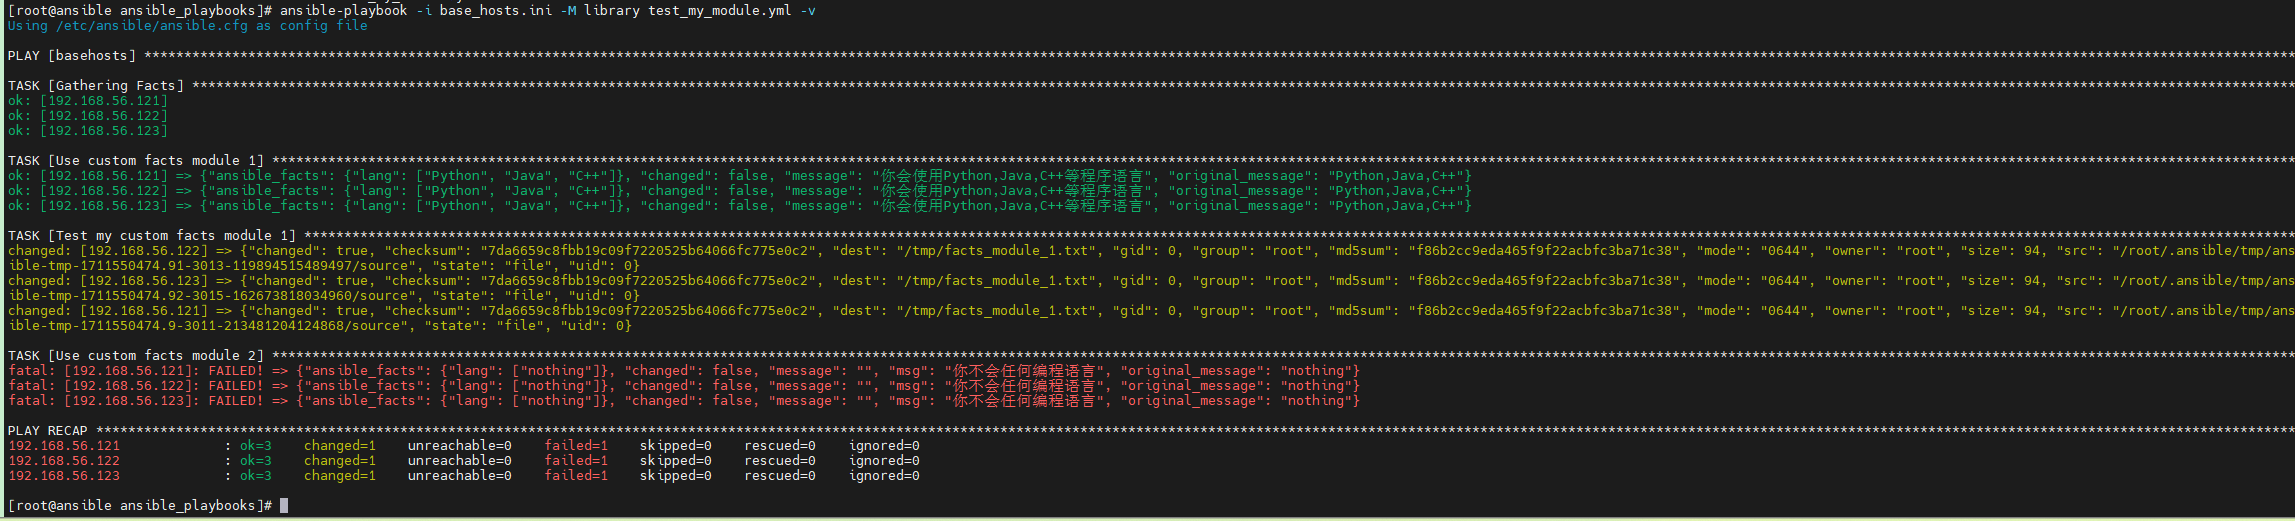
在节点上面查看文件信息:
| |
可以看到,正常将我们通过自定义facts模块指定的事实变量渲染到远程工作节点了。说明我们的自定义模块能够正常工作。
任务Use custom facts module 2失败是正常的,因为在模块指指定了只要name参数的值是nothing,就会将任务的状态设置为失败。
注意,此处不在乎Jinja2渲染细节,详细可参考官方文档 欢迎来到 Jinja2
编写其他自定义模块参考本文前述总结即可。